Understanding kernel architecture – part 1
Exploring LKMs
The LKM framework
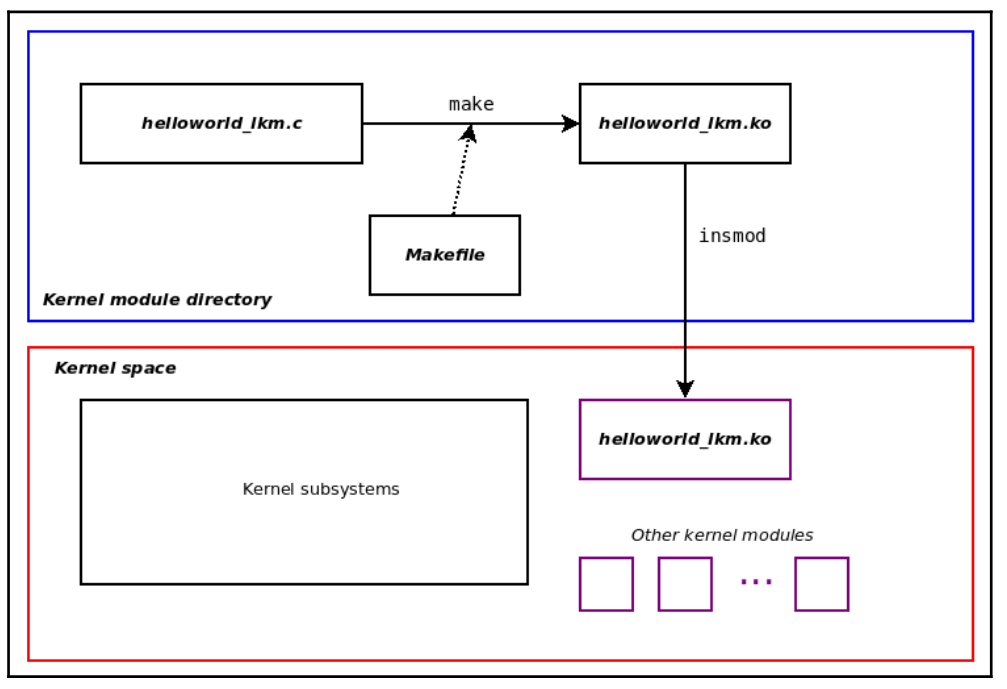
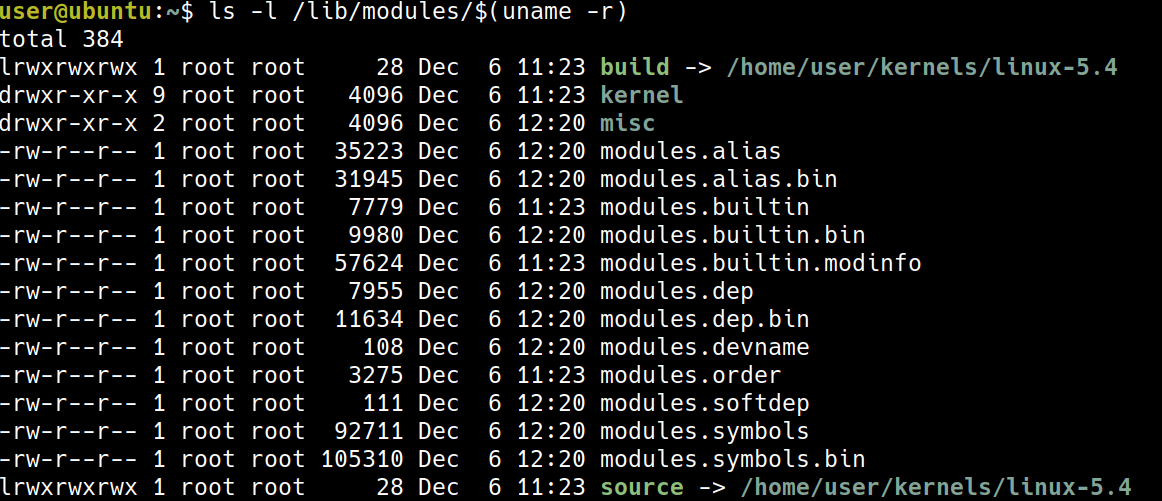
Kernel modules within the kernel source tree
- kernel modules 存放於
/lib/modules/$(uname -r)/ 以我的例子來說,正在運行 95 個 modules,可以發現跟書上的範例 5359 差很多,我的推測是我使用的是 server 版,書上使用的是 desktop 版。
其中一個大量使用 modules 這種方式的是 device driver,例如可以看 kernel/drivers/net/ethernet
原先 Ubuntu 18.04 的 netword drivers:

我自己編譯的
5.4.1-llkd01的 device drivers: 明顯少了許多,這是因為當初在 build 時,是使用
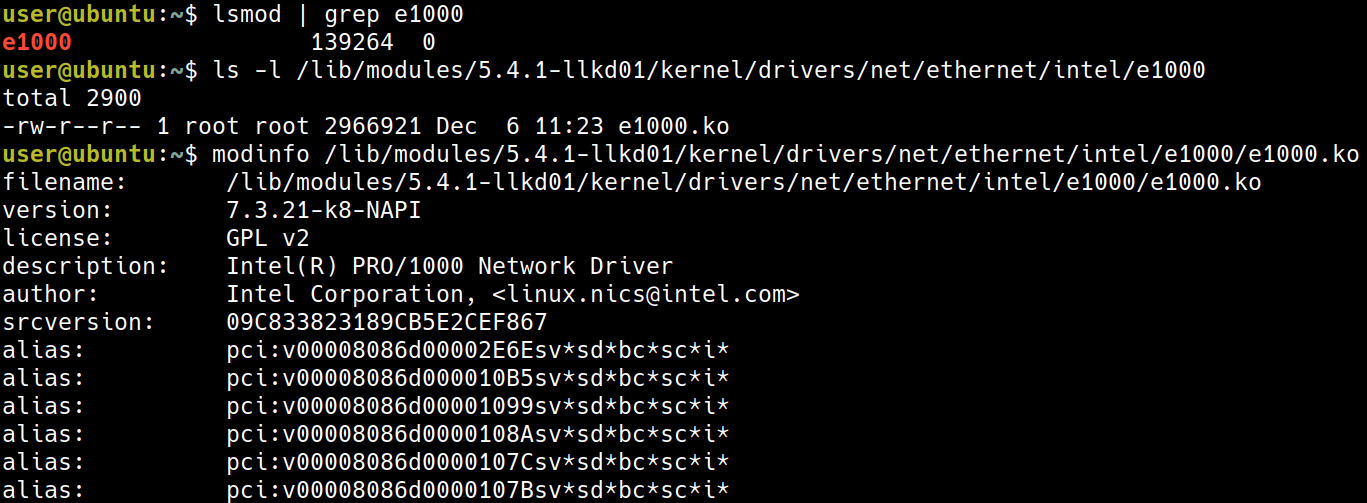
 lsmod抓取正在運行中的 module,並不像 ubuntu 需要考慮各種可能的情境其中的個有名的 driver 是 Intel 1GbE Network Interface Card (NIC)
lsmod | grep e1000

- 使用
modinfo可以獲取更多的資訊
ls -l /lib/modules/5.4.1-llkd01/kernel/drivers/net/ethernet/intel/e1000
modinfo /lib/modules/5.4.1-llkd01/kernel/drivers/net/ethernet/intel/e1000/e1000.ko
Writing our very first kernel module
這節開始很俗氣的來寫 Hello World 怕打錯字的話,可以用連結 https://github.com/PacktPublishing/Linux-Kernel-Programming
Introducing our Hello, world LKM C code
/*
 * ch4/helloworld_lkm/helloworld_lkm.c
 ***************************************************************
 * This program is part of the source code released for the book
 *  "Linux Kernel Programming"
 *  (c) Author: Kaiwan N Billimoria
 *  Publisher:  Packt
 *  GitHub repository:
 *  https://github.com/PacktPublishing/Linux-Kernel-Programming
 *
 * From: Ch 4: Writing your First Kernel Module - LKMs Part 1
 ****************************************************************
 * Brief Description:
 * Our very first kernel module, the 'Hello, world' of course! The
 * idea being to explain the essentials of the Linux kernel's LKM
 * framework.
 *
 * For details, please refer the book, Ch 4.
 */
#include <linux/init.h>
#include <linux/kernel.h>
#include <linux/module.h>

MODULE_AUTHOR("<insert your name here>");
MODULE_DESCRIPTION("LKP book:ch4/helloworld_lkm: hello, world, our first LKM");
MODULE_LICENSE("Dual MIT/GPL");
MODULE_VERSION("0.1");

static int __init helloworld_lkm_init(void)
{
	printk(KERN_INFO "Hello, world\n");
	return 0;		/* success */
}

static void __exit helloworld_lkm_exit(void)
{
	printk(KERN_INFO "Goodbye, world\n");
}

module_init(helloworld_lkm_init);
module_exit(helloworld_lkm_exit);
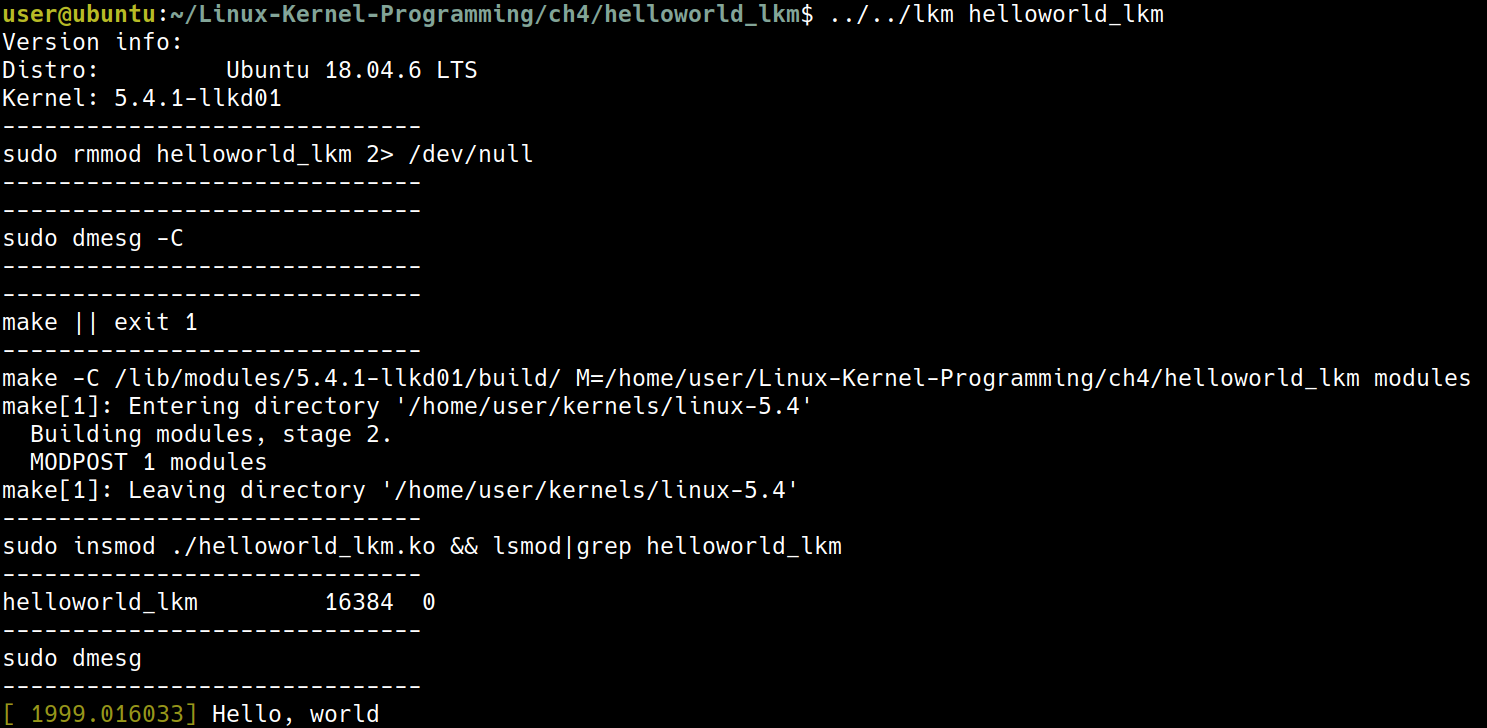
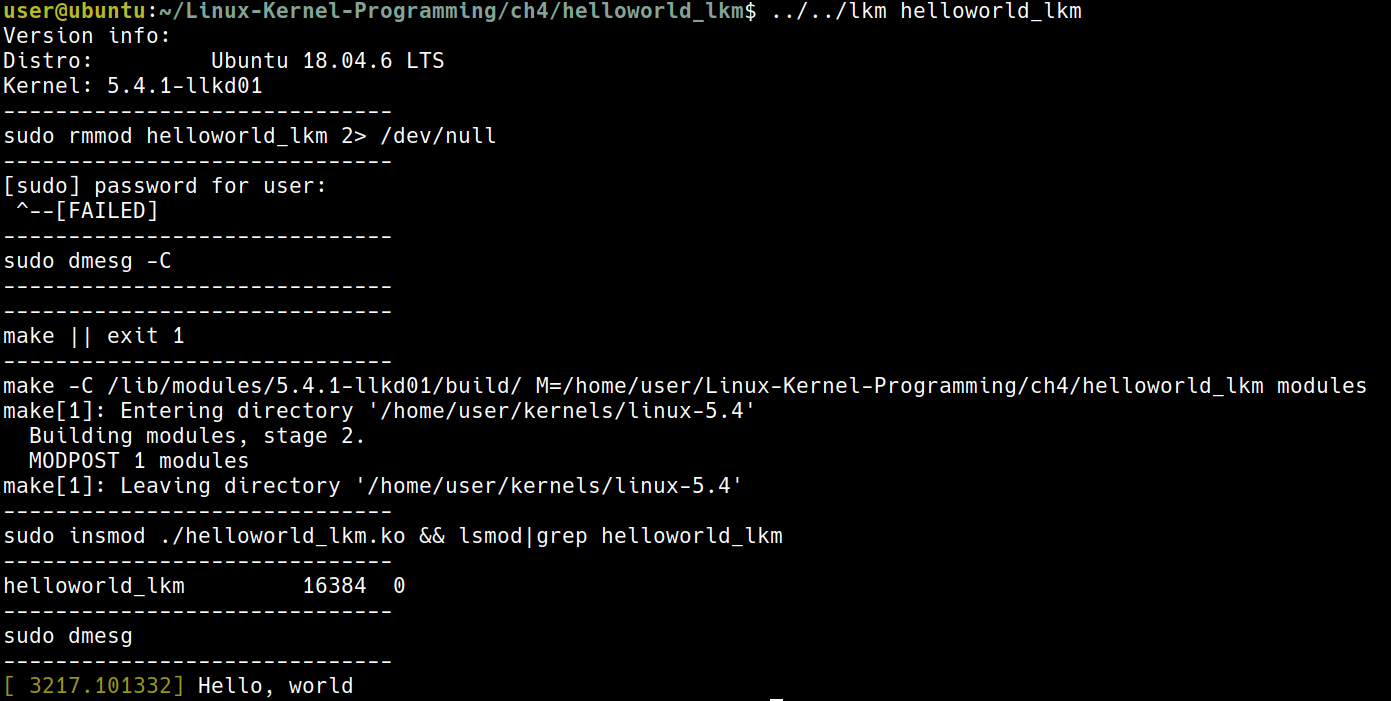
cd ~/Linux-Kernel-Programming/ch4/helloworld_lkm
../../lkm helloworld_lkm
Breaking it down
Kernel headers
#include <linux/init.h>
#include <linux/kernel.h>
#include <linux/module.h>
這三個 include,實際上是 include /lib/modules/$(uname -r)/build/include/ 中的檔案
實際上也就是這三個檔案


include
/lib/modules/5.4.1-llkd01/build/include這裡的檔案也是
/home/user/kernels/linux-5.4/include的意思
Module macros
這四個 macro 也都蠻直觀的
MODULE_AUTHOR()MODULE_DESCRIPTION()MODULE_LICENSE()MODULE_VERSION()
Entry and exit points
- 並不像是寫 application 時會使用
main(),module 則是使用這兩個 macro 來指定 entry and exit points
module_init(helloworld_lkm_init);
module_exit(helloworld_lkm_exit);
可以想成有點像是 C++ 中的 constructor/destructor
Return values
static int __init <modulename>_init(void);
static void __exit <modulename>_exit(void);
注意這裡的 __init() 跟 __exit() 長成這個樣子,在技術上來說並不是必須的,不過這是一個好的 naming practice
The 0/-E return conventio
- 如果成功,回傳 0
- 失敗則回傳
errno include/uapi/asm-generic/errno-base.h與include/uapi/asm-generic/errno.h定義了一些errono
例如可能像是下面這種使用方式,像是 ENOMEM 就定義在 include/uapi/asm-generic/errno.h 中
[...]
ptr = kmalloc(87, GFP_KERNEL);
if (!ptr) {
pr_warning("%s:%s:%d: kmalloc failed!\n", __FILE__, __func__,
__LINE__);
return -ENOMEM;

}
[...]
return 0; /* success */
- 如果
CONFIG_MODULE_FORCE_UNLOAD設為 disable,則module_exit()有可能可以放入一些無法 unload 的程式碼(當然這是不理想的情況)
The ERR_PTR and PTR_ERR macros
這裡主要要解決的問題是如果我希望這個 function 要回傳像是 address,這樣可能會把 address 誤認為錯誤碼,所以需要一些macro 來處理及判斷。
struct mystruct * myfunc(void)
{
    struct mystruct *mys = NULL;
    // 嘗試分配記憶體
    mys = kzalloc(sizeof(struct mystruct), GFP_KERNEL);

    // 檢查記憶體分配是否失敗
    if (!mys)
        // 失敗時,返回一個偽裝成指標的錯誤碼:-ENOMEM
        return ERR_PTR(-ENOMEM);

    [...]
    // 成功時,返回實際的結構體指標
    return mys;
}
[...]
gmys = myfunc(); // 接收返回值,它可能是指標或錯誤碼

// 檢查返回的「指標」是否是一個錯誤碼
if (IS_ERR(gmys)) {
    pr_warn("%s: myfunc alloc failed, aborting...\n", OURMODNAME);

    // 將偽裝的錯誤碼指標還原為原始的整數錯誤碼
    stat = PTR_ERR(gmys); /* sets 'stat' to the value -ENOMEM */

    goto out_fail_1;
}

// 程式碼繼續執行 (如果 gmys 是有效指標)
[...]
return stat;

out_fail_1:
return stat;
}
The __init and __exit keywords
__init: 代表這個 function 只會使用一次,使用之後就可以利用free_initmem()刪除掉__exit: 在這個 function 結束之後,all the memory is freed
Common operations on kernel modules
先前的內容直接用了預先寫好的 script 來建立一個 module,但試想現在的情境是我們要如何從一個 .c file 變成一個實際運行的 module 並且不用這本書書預先寫好的 script
常用的操作有
- 如何 build
- 如何 load
- 確認 module 的狀態 (
printk()andlsmod) - unload
Building the kernel module (如何 build)
- 先 clone 這個 repo https://github.com/PacktPublishing/Linux-Kernel-Programming
cd ~/Linux-Kernel-Programming/ch4/helloworld_lkm
make

出現了一個 helloworld_lkm.ko
Running the kernel module
為了要啟用這個 kernle module, 我們需要把 helloworld_lkm.ko 載入到記憶體,有數種方式,像是 init_module system call,或是這本書使用的工具 insmod
sudo insmod ./helloworld_lkm.ko

現在成功載入這個 module 了
可能會讓 init_module 失敗的原因有幾個:
- 權限不足
/proc/sys/kernel/modules_disabled, is set to 1 (it defaults to 0).- 撞到相同的名子
A quick first look at the kernel printk() (確認 module 的存活狀態:透過 log 確認)
跟 printf() 的用法很像,但是 printf() 會直接 print 到螢幕上,printk() 可能輸出到
- A kernel log buffer in RAM (volatile)
- A log file, the kernel log file (non-volatile)
- The console device
使用 dmesg 可以看到 printk() 印出的東西

Listing the live kernel modules (確認 module 的存活狀態:列出所有 log)
現在我們的 helloworld_lkm.ko 在輸出訊息之後,就不做任何事情了,它現在就單純的存在於 kernel memory and do nothing
使用 lsmod 可以看到現在還存在哪些 module

Unloading the module from kernel memory ()
使用 rmmod 可以移除 module
sudo rmmod helloworld_lkm

rmmod 失敗的情境如下
- Permissions
- 如果要刪除的 module 是其他 module 的 dependency
- 沒有 destructor
module_exit()andCONFIG_MODULE_FORCE_UNLOADis disable
Our lkm convenience script
 可以使用
可以使用 lkm 這個腳本做 insert, 記得要用 rmmod 把 module 刪掉
Understanding kernel logging and printk
再複習一次 printk() 可能輸出的地方有:
- A kernel log buffer (in RAM; volatile)
- A kernel log file (non-volatile)
- The console device
Using the kernel memory ring buffer
- 存放於 kernel address space,也就是在 RAM 中,所以例如電腦突然關機,我們就會失去可以用來 debug 的資料
- log buffer 大約只有 256 KB,並且是一個 ring buffer 所以有可能舊的資料會被洗掉
Kernel logging and systemd’s journalctl
為了解決 ring buffer 的問題,我們可以把資料寫到一個 file 中
- Red-Hat based:
/var/log/messages - Debian based:
/var/log/syslog - 較舊的版本可使用 system logger daemon (
syslogd) - 比較新的版本使用
systemd並且在systemd的框架下,使搭配systemd-journal,journalctl
journalctl -k | tail -n2

Using printk log levels
在 helloworld_lkm 的例子中,
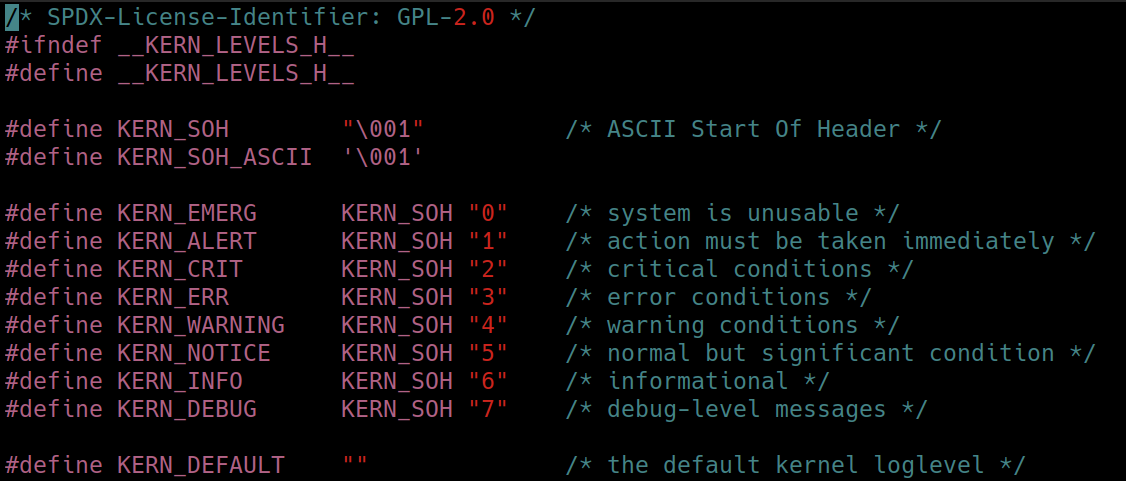
printk(KERN_INFO "Hello, world\n");
這裡的 KERN_INFO 表示了 log level,但是要注意這並不是一個 parameter,他並沒有用逗號隔開
在 include/linux/kern_levels.h 中可以看到這些 log level 的定義
 要注意這裡的 log level 並不是 priority 的概念,而是單純的作為一種 filtering 的功能
- 以
hangcheck-timer作為例子 hangcheck-timer可以當成 watch dog 的功能- 在
drivers/char/hangcheck-timer.c: 像是這裡,使用了KERN_CRIT的 log level
printk的 default level 是 4 也就是KERN_WARNING
The pr_<foo> convenience macros
如果每次都要用
printk(KERN_INFO "Hello, world\n");
會很麻煩,所以使用這時候就可以用 pr_info() 這個 macro, 同理這個系列有
include/linux/printk.h
#ifndef pr_fmt
#define pr_fmt(fmt) fmt
#endif

/*
 * These can be used to print at the various log levels.
 * All of these will print unconditionally, although note that pr_debug()
 * and other debug macros are compiled out unless either DEBUG is defined
 * or CONFIG_DYNAMIC_DEBUG is set.
 */
#define pr_emerg(fmt, ...) \
    printk(KERN_EMERG pr_fmt(fmt), ##__VA_ARGS__)
#define pr_alert(fmt, ...) \
    printk(KERN_ALERT pr_fmt(fmt), ##__VA_ARGS__)
#define pr_crit(fmt, ...) \
    printk(KERN_CRIT pr_fmt(fmt), ##__VA_ARGS__)
#define pr_err(fmt, ...) \
    printk(KERN_ERR pr_fmt(fmt), ##__VA_ARGS__)
#define pr_warning(fmt, ...) \
    printk(KERN_WARNING pr_fmt(fmt), ##__VA_ARGS__)
#define pr_warn pr_warning
#define pr_notice(fmt, ...) \
    printk(KERN_NOTICE pr_fmt(fmt), ##__VA_ARGS__)
#define pr_info(fmt, ...) \
    printk(KERN_INFO pr_fmt(fmt), ##__VA_ARGS__)
/*
 * Like KERN_CONT, pr_cont() should only be used when continuing
 * a line with no newline ('\n') enclosed. Otherwise it defaults
 * back to KERN_DEFAULT.
 */
#define pr_cont(fmt, ...) \
    printk(KERN_CONT fmt, ##__VA_ARGS__)

/* pr_devel() should produce zero code unless DEBUG is defined */
#ifdef DEBUG
#define pr_devel(fmt, ...) \
    printk(KERN_DEBUG pr_fmt(fmt), ##__VA_ARGS__)
#else
#define pr_devel(fmt, ...) \
    no_printk(KERN_DEBUG pr_fmt(fmt), ##__VA_ARGS__)
#endif
可以做使用
Wiring to the console
再再次的回想一下,printk() 可以 output 的範圍有:
- The first being the kernel memory log buffer (always)
- The second being non-volatile log files
- The last one (that we’ll address here): the console device
(base) turtlegod@thinkpad:~$ cat /proc/sys/kernel/printk
4       4       1       7
這四個數字分別代表
- The current (console) log level
- The implication being that all messages less than this value will appear on
- the console device!
- The default level for messages that lack an explicit log level
- The minimum allowed log level
- The boot-time default log level
- all printk instances lower than log level 4 will appear on the console device
Writing output to the Raspberry Pi console
連接 USB to TTL
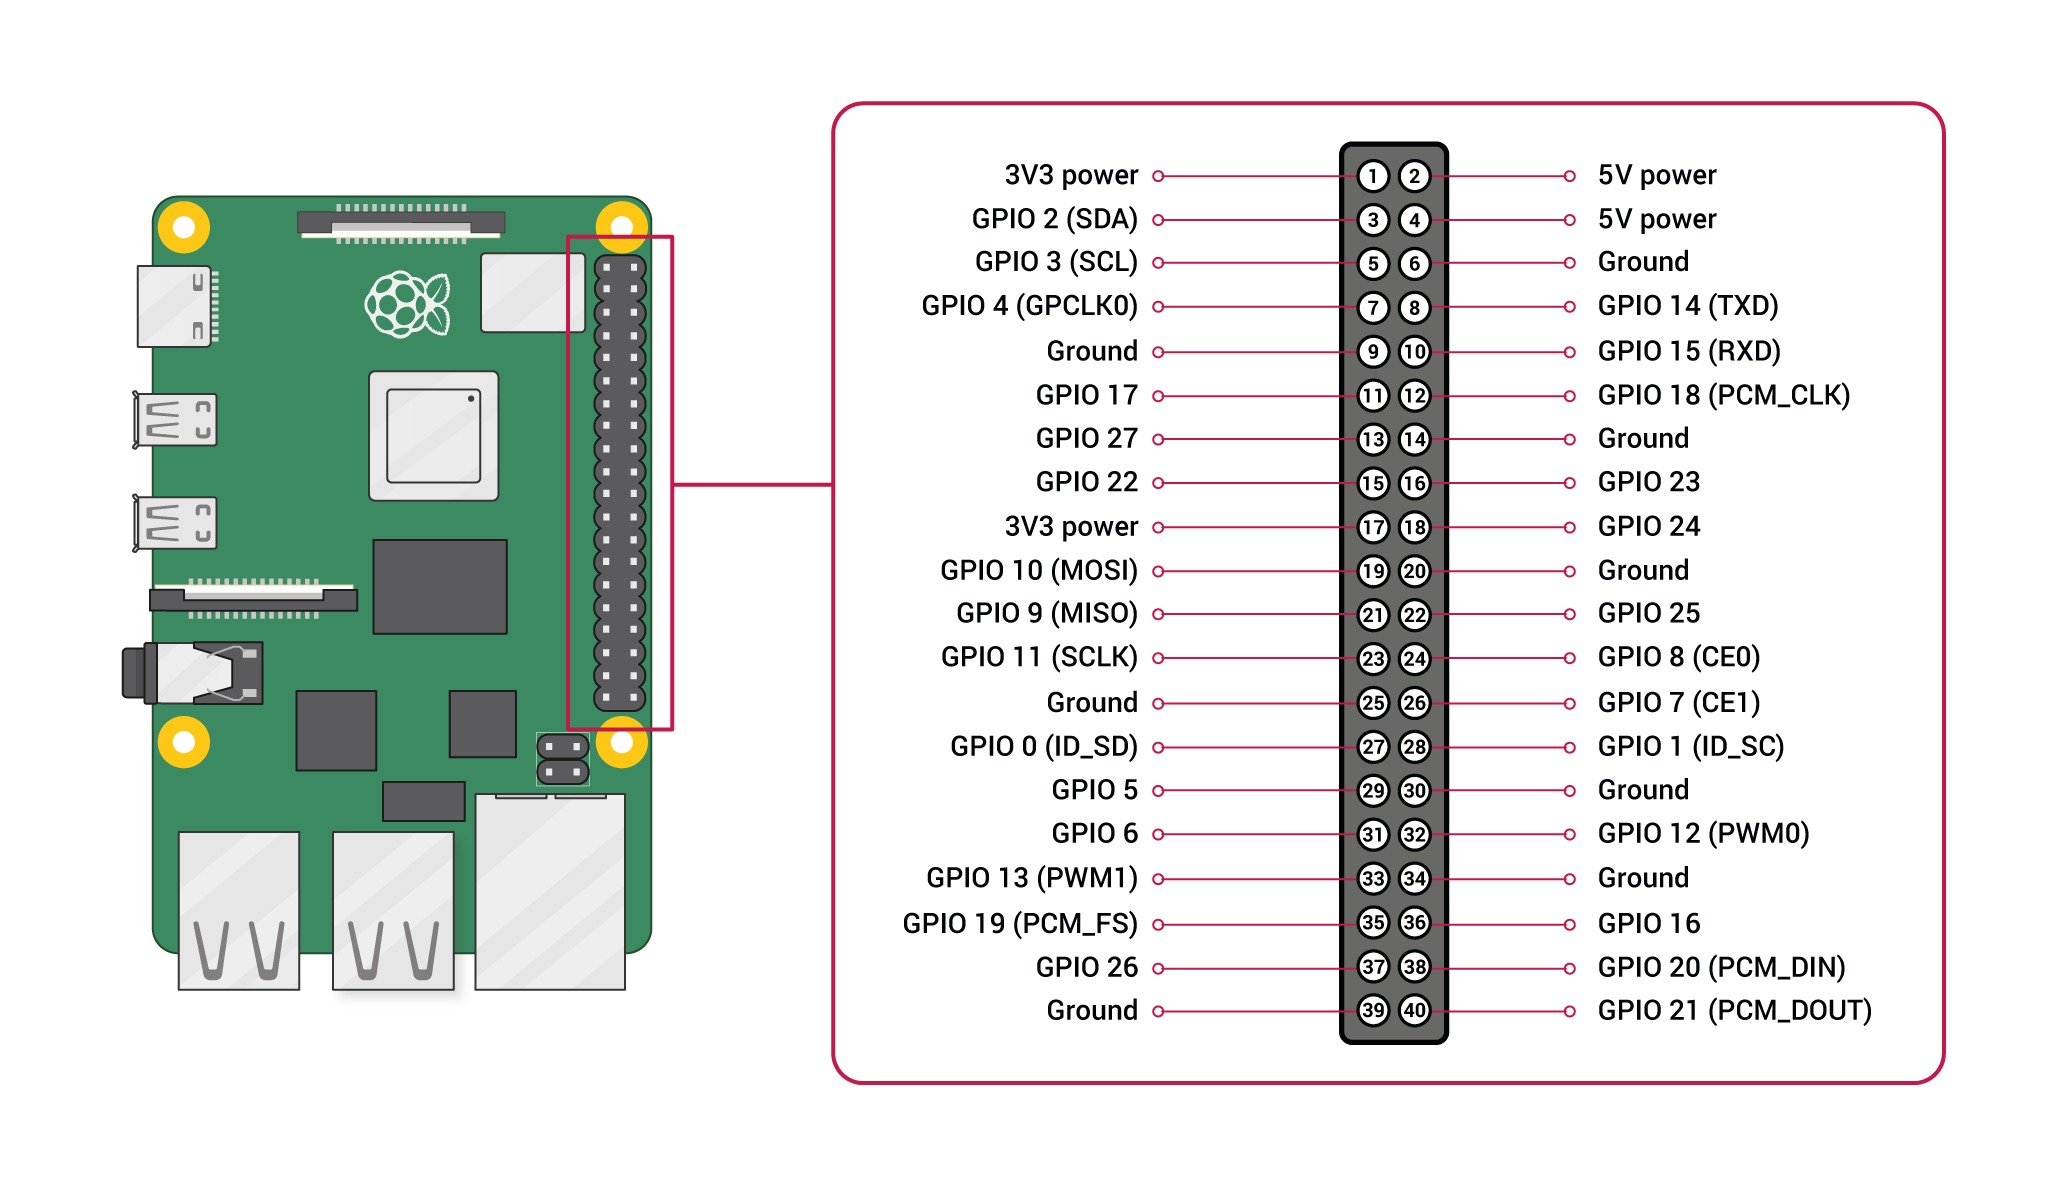
這裡需要一條 USB to TTL 的線並且經由 minicom 連到
pin 6: GNDTTL 上的 RX 連到 Raspberry Pi 4 上的 TX (
GPIO 14)TTL 上的 TX 連到 Raspberry Pi 4 上的 RX (
GPIO 15)注意這裡是 cross the data lines: Cable RX goes to Pi TX, and Cable TX goes to Pi RX
修改 config.txt
這個步驟主要是要開啟 Pi 上的 uart 功能
# Example mounting setup (create directories first if they don't exist)
sudo mkdir -p ~/mnt/pi-boot ~/mnt/pi-root
# Replace /dev/sdX1 and /dev/sdX2 with your SD card device names
sudo mount /dev/mmcblk0p1 ~/mnt/pi-boot   # Boot partition (FAT32)
sudo mount /dev/mmcblk0p2 ~/mnt/pi-root   # Root partition (Ext4)
sudo vim ~/mnt/pi-boot/config.txt
在最下面增加
enable_uart=1
sudo umount ~/mnt/pi-boot
sudo umount ~/mnt/pi-root
使用 minicom 連上 Pi
sudo apt install minicom
sudo screen /dev/ttyUSB0 115200 # user, user
(這裡比較推薦用 screen, 比較容易成功登入)
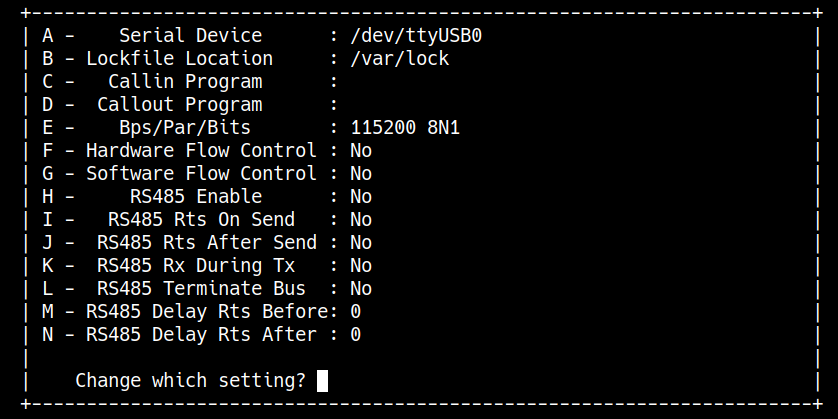
minicom 的設定
在筆電上
sudo apt update && sudo apt install minicom lrzsz -y
在 pi 上
sudo apt update && sudo apt install lrzsz -y
第一次設定 Minicom
sudo minicom -s
sudo minicom -D /dev/ttyUSB0 -b 115200
(目前比較推薦 screen)
- 注意如果是剛燒好的 SD card 還是要先連上螢幕做帳號密碼的設定
Enabling the pr_debug() kernel messages
Rate limiting the printk instances
Generating kernel messages from the user space
Standardizing printk output via the pr_fmt macro
Portability and the printk format specifiers
Understanding the basics of a kernel module Makefile
# ch4/printk_loglvl/Makefile
PWD          := $(shell pwd)
obj-m        += printk_loglvl.o

# Enable the pr_debug() and pr_devel() as well by removing the comment from
# one of the lines below
#EXTRA_CFLAGS += -DDEBUG
#CFLAGS_printk_loglvl.o := -DDEBUG

all:
    make -C /lib/modules/$(shell uname -r)/build/ M=$(PWD) modules
install:
    make -C /lib/modules/$(shell uname -r)/build/ M=$(PWD) modules_install
clean:
    make -C /lib/modules/$(shell uname -r)/build/ M=$(PWD) clean
可以注意到這裡並沒有使用 gcc 而是在這裡面用了 make
target: [dependent-source-file(s)]
    rule(s)