Cross-compiling a kernel module
在 ch4 時,我們 compile 了一個 kernel module, 這次則是要 cross-compile 一個 kernel module
Attempt 1 – setting the “special” environment variables
先試著設定 ARCH 與 CROSS_COMPILE
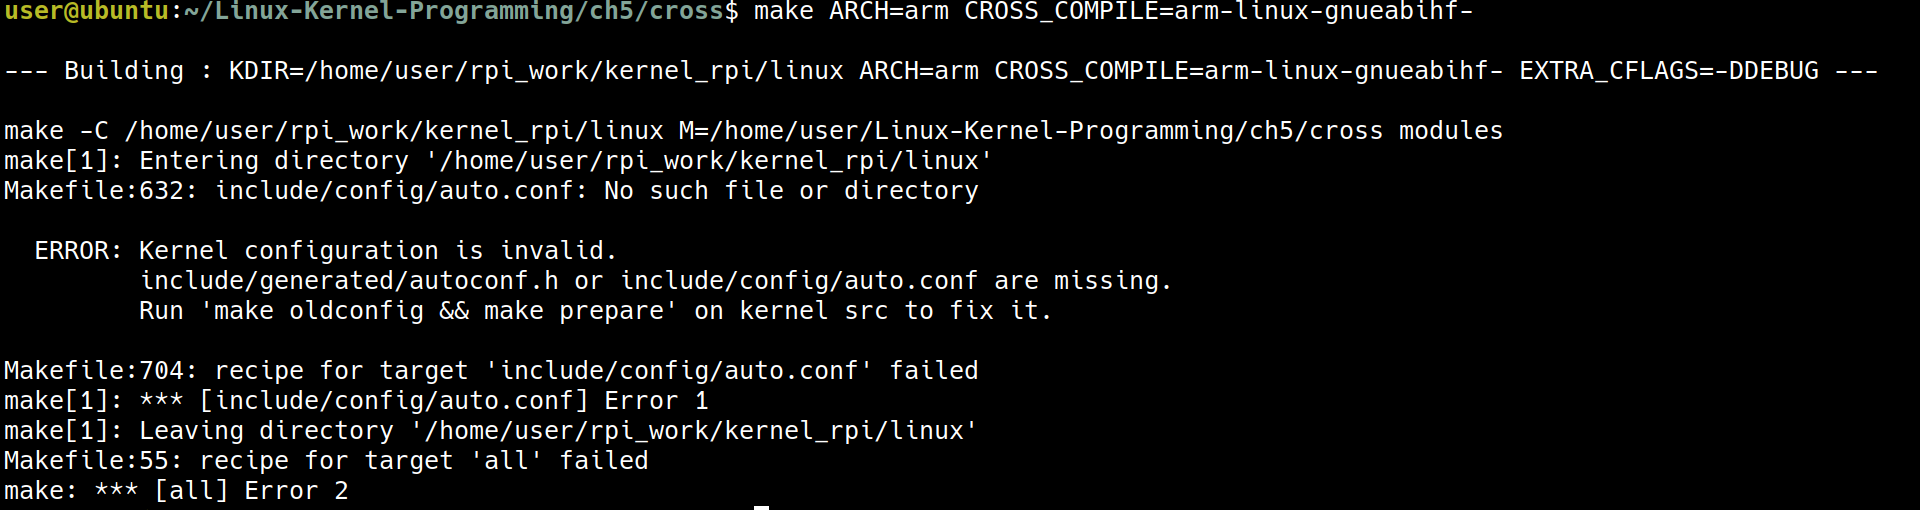
cd ~/Linux-Kernel-Programming/ch5/cross
make ARCH=arm CROSS_COMPILE=arm-linux-gnueabihf-

但這個嘗試失敗了,這是因為在這個例子中,是因為 Makefile 會去找目前這台電腦的 Kernel source,因此要來對 Makefile 做下列的修改
ifeq ($(ARCH),arm)
  # *UPDATE* 'KDIR' below to point to the ARM Linux kernel source tree on your box
  KDIR ?= /home/user/rpi_work/kernel_rpi/linux
else ifeq ($(ARCH),arm64)
  # *UPDATE* 'KDIR' below to point to the ARM64 (Aarch64) Linux kernel source
  # tree on your box
  KDIR ?= /home/user/rpi_work/kernel_rpi/linux
else ifeq ($(ARCH),powerpc)
  # *UPDATE* 'KDIR' below to point to the PPC64 Linux kernel source tree on your box
  KDIR ?= ~/kernel/linux-4.9.1
else
  # 'KDIR' is the Linux 'kernel headers' package on your host system; this is
  # usually an x86_64, but could be anything, really (f.e. building directly
  # on a Raspberry Pi implies that it's the host)
  KDIR ?= /lib/modules/$(shell uname -r)/build
endif
這裡主要是把 kernel source 的路徑改為正確的 /home/user/rpi_work/kernel_rpi/linux
Attempt 2 – pointing the Makefile to the correct kernel source tree for the target
修正路徑之後,再一次嘗試 cross compile
make ARCH=arm CROSS_COMPILE=arm-linux-gnueabihf-
這是因為現在的 rpi_work/kernel_rpi 還是一個 “virgin” state, 它還沒有獲得一個 .config 的設定檔
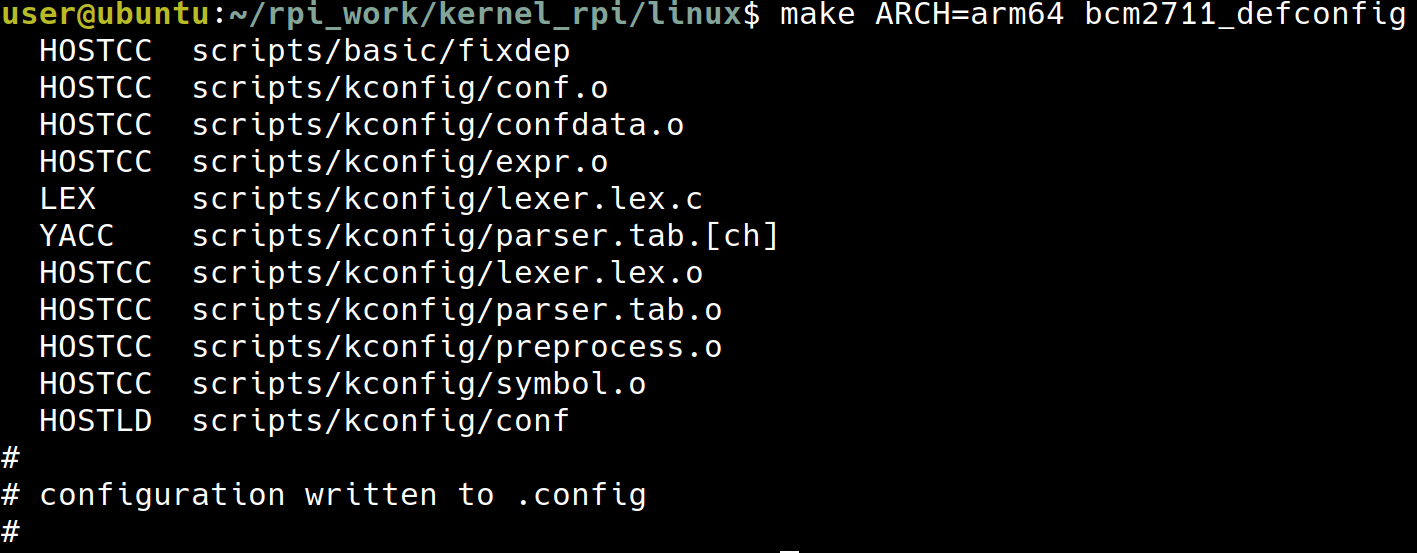
cd ~/rpi_work/kernel_rpi/linux
- 書上用的是
bcmrpi_defconfig但我用的是 64-bit 的 raspberry pi 4 所以要用bcm2711_defconfig
make ARCH=arm64 bcm2711_defconfig
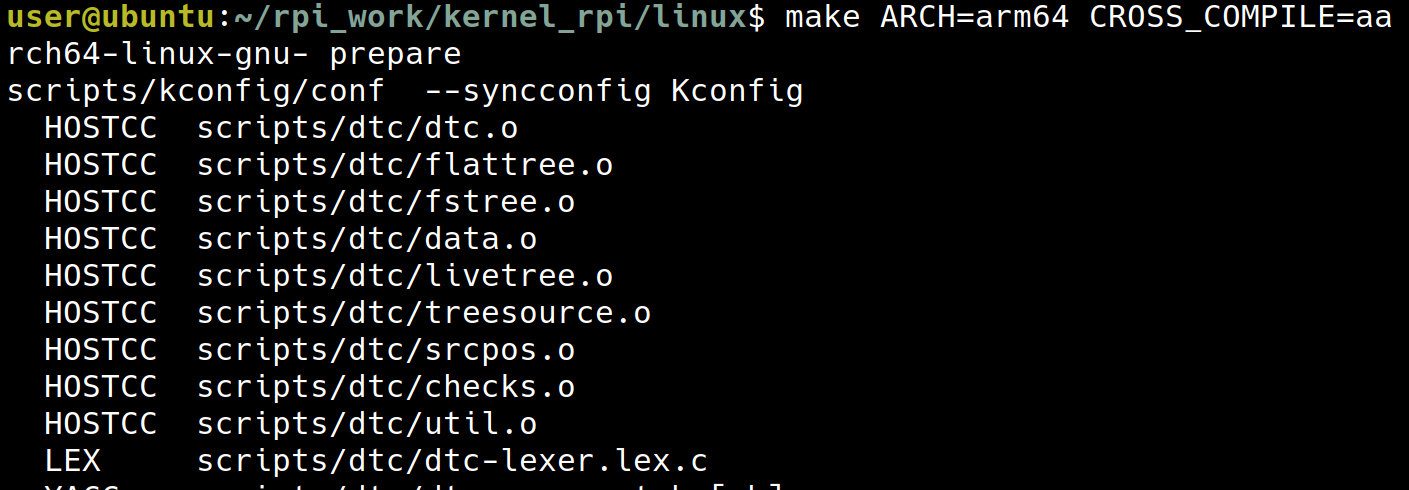
make ARCH=arm64 CROSS_COMPILE=aarch64-linux-gnu- oldconfig

到了這裡,已經產生出一個 .config 了
make ARCH=arm64 CROSS_COMPILE=aarch64-linux-gnu- prepare
make ARCH=arm64 CROSS_COMPILE=aarch64-linux-gnu-
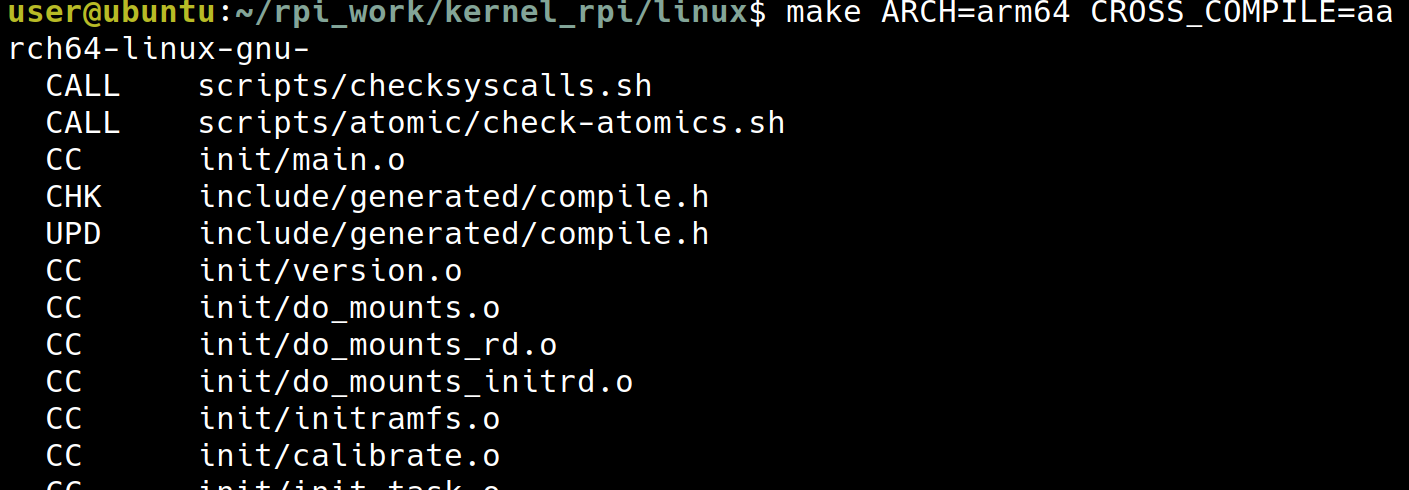 (這個會跑一陣子)
這個指令會產生出以下的檔案
(這個會跑一陣子)
這個指令會產生出以下的檔案
arch/arm64/boot/Image: 未壓縮的 Kernel Imagearch/arm64/boot/dts/broadcom/*.dtb: Device Tree Blobsarch/arm64/boot/dts/overlays/*.dtbo: Device Tree Overlays
這裡的流程跟 ch03 在 corss compile pi 的 kernel 時有一點類似
Attempt 3 – cross-compiling our kernel module
現在 kernel 已經 build 好了,現在就可以再重新的 build 一次
cd /home/user/Linux-Kernel-Programming/ch5/cross
make ARCH=arm64 CROSS_COMPILE=aarch64-linux-gnu-
現在 make 時,就會搭配上個步驟產生出的 .config 以及上個步驟 make 出來的東西產生出我們需要的 .ko file
 現在這個
現在這個 ./helloworld_lkm.ko 出現了!
接著把檔案複製到 pi 中
scp ./helloworld_lkm.ko [email protected]:/home/user
sudo insmod ./helloworld_lkm.ko

這是因為目前 pi 上跑的 kernel version 跟這個 moduel 所對應的 kernel version 不一樣
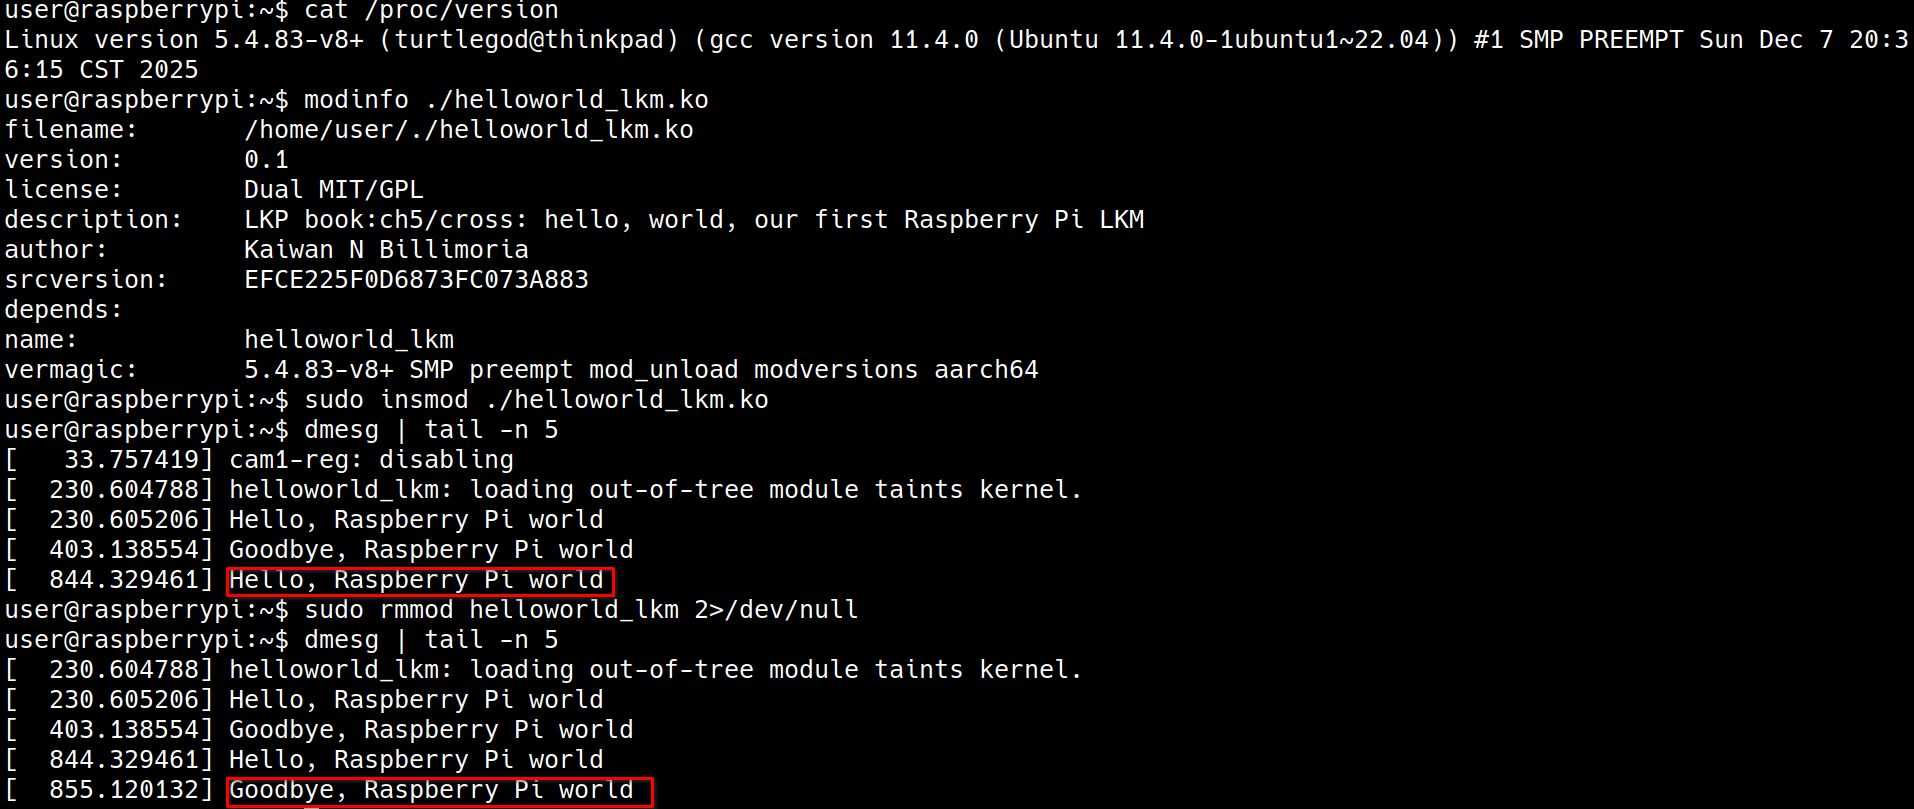
cat /proc/version
modinfo ./helloworld_lkm.ko

這讓我們學到了 module 只被允許被 insert 到它所對應的 kernel 版本,在這裡來回想一下 module 的 kernel version 跟我們現在 pi 上的 kernel version 是怎麼來的
- module 的 kernel version:
Makefile中指定 kernel source 路徑為~/rpi_work/kernel_rpi/linux- 在
~/rpi_work/kernel_rpi/linux裡我們針對這個 kernel version 做 config 以及 compile - 回到
/home/user/Linux-Kernel-Programming/ch5/cross來make出.ko時,它所搭配的 kernel version 就被前兩個步驟決定好了
- pi 上的 kernel version
- 這是單純使用 imager 工具所提供的 Pi OS 版本
Attempt 4 – cross-compiling our kernel module
為了解決 Attempt 3 所留下的問題,有兩種解決方式,要麼 module 去搭配現在 pi 上運行的 kernel version,要麼 kernel 去搭配現在要使用的 module 的版本,以現在的環境來說,後者比較方便一些
這裡基本上只需要用 ch03 的方式去更改 pi 中的 kernel version 就可以了
cat /proc/version
modinfo ./helloworld_lkm.ko
sudo insmod ./helloworld_lkm.ko
dmesg | tail -n 5
sudo rmmod helloworld_lkm 2>/dev/null
dmesg | tail -n 5
 到了這裡,我們已經可以 cross compile 一個 module 到手上的 pi 上了!
Gathering minimal system information
這裡要開始蒐集一些系統上的資訊並且作為 log 輸出,書上提供範例 ch5/min_sysinfo
cd ch5/min_sysinfo
make ARCH=arm64 CROSS_COMPILE=aarch64-linux-gnu-
這裡我遇到了這個問題
user@raspberrypi:~ $ sudo insmod ./min_sysinfo.ko
insmod: ERROR: could not insert module ./min_sysinfo.ko: Unknown symbol in module
解決方式為在 Makefile 中加入
EXTRA_CFLAGS += -DDEBUG -fno-stack-protector
產生出 min_sysinfo.ko 之後,複製到 pi 上,並且在 pi 上
sudo insmod ./min_sysinfo.ko
dmesg
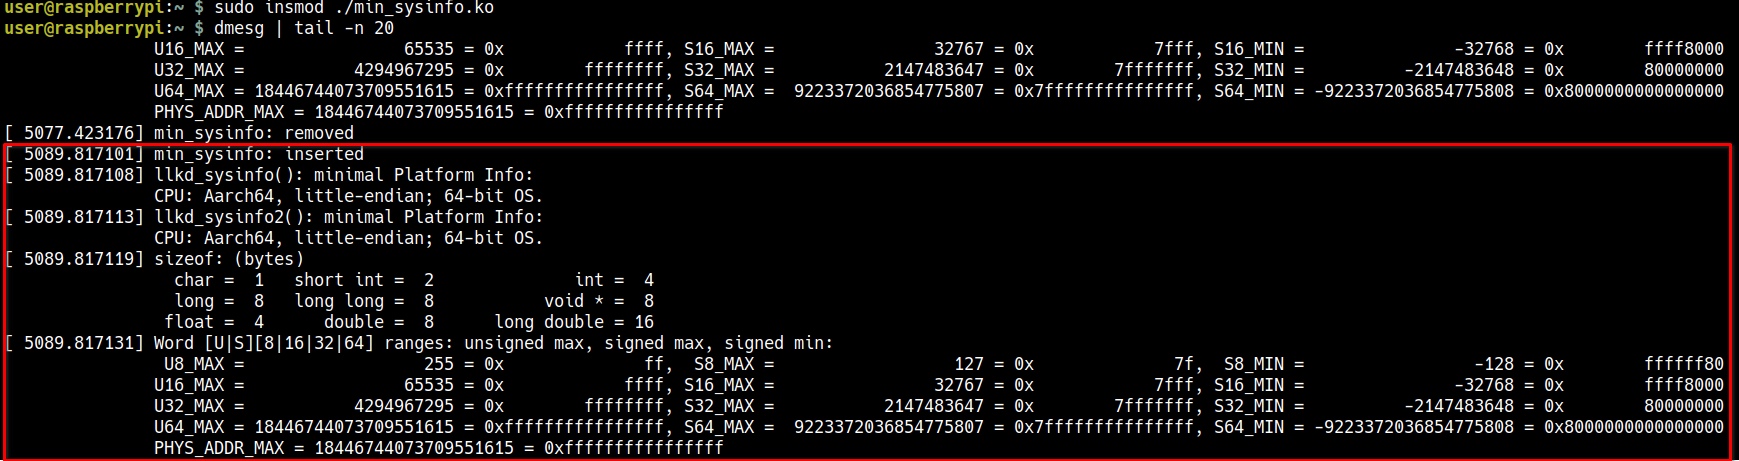
除了用 cross compile 的方式跑在 arm64 上,這個 min_sysinfo.c 也可以為了 x86 編譯
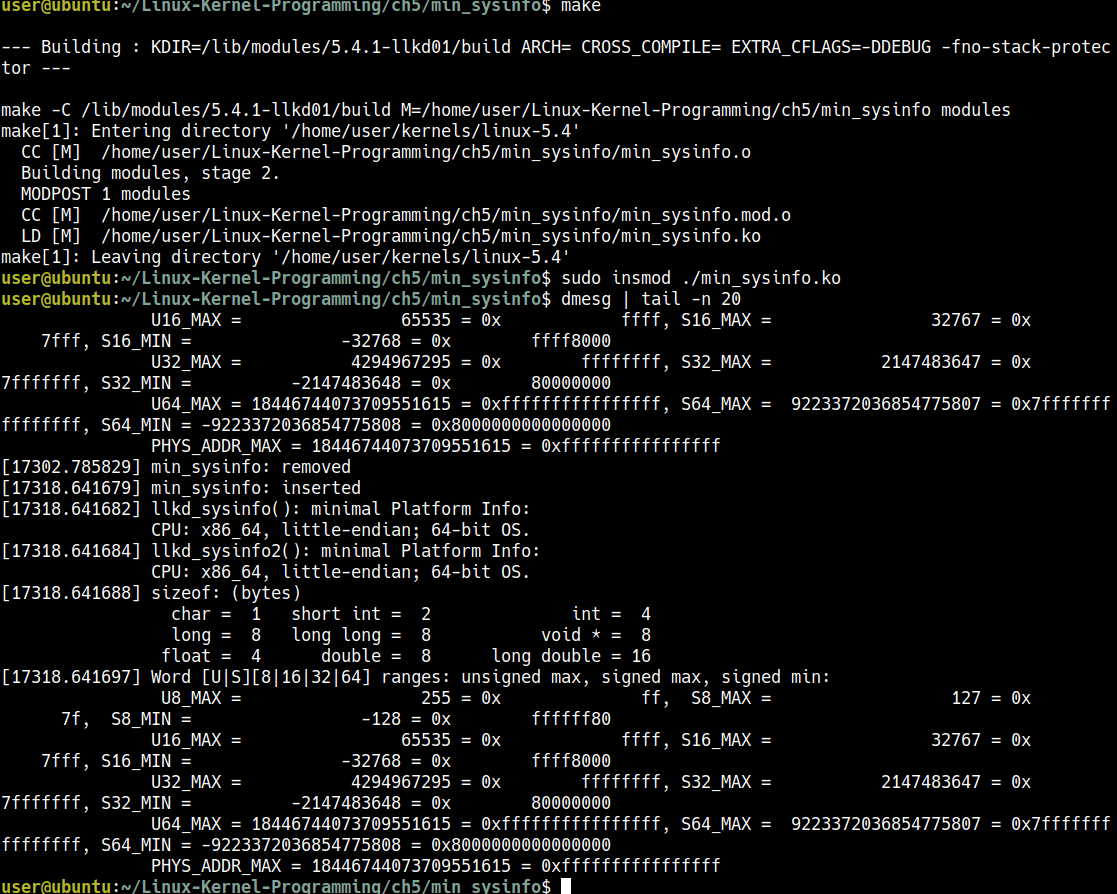
這個範例主要顯現了同一個 .c file 可以經由編譯程序上的調整達到 portability
Being a bit more security-aware
Emulating “library-like” features for kernel modules
實際上不是 Library,但是有一些技巧可以做到 Library-like 的事情,有以下這兩種方式可以做到類似於 library-like 的功能
- including the “library” code to your kernel module object
- module stacking
通常第二個方式會比較好一些
Performing library emulation via multiple source files
到了目前為止的範例,我們都只有用一個 .c file,但是在現實的環境當中,經常是使用多個 C source file 所 compile 出一個 .ko binary object
例如現在有一個 kernel module project 叫做 projx,並且是透過三個檔案 prj1.c, prj2.c, prj3.c 所組成,這種時候,會在 Makefile 中這樣寫:
obj-m := projx.o
projx-objs := prj1.o prj2.o prj3.o
這可以利用 projx 這個 prefix 讓 prj1.o prj2.o prj3.o link 成 projx.o
Understanding function and variable scope in a kernel module
在 2.6 Linux 之前,static and global variable 是可以被整個 kernel 看到的,現在則限縮在一個 module 中,但也可以利用 EXPORT_SYMBOL() 讓它變成舊有的方式
static int my_glob = 5;
static long my_foo(int key)
{ [...]
}
像是上面這個就只有自己本身的 kernel module 可以看到
如果希望它可以被整個 kernel 看到的話可以使用:
int my_glob = 5;
EXPORT_SYMBOL(my_glob);
long my_foo(int key)
{ [...]
}
EXPORT_SYMBOL(my_foo);
注意到這裡使用 EXPORT_SYMBOL() 的話,甚至連 static 都不用使用
利用這個特點,我們可以在某個 module 中提供一些 EXPORT_SYMBOL() 的 function or variable 讓其他 subsystem 或是 module 可以使用
例如 device driver 需要處理 hardware interrupt 時,會需要使用 request_threaded_irq()
int request_threaded_irq(unsigned int irq, irq_handler_t handler,
			 irq_handler_t thread_fn, unsigned long irqflags,
			 const char *devname, void *dev_id)
{
    // [...]
}
EXPORT_SYMBOL(request_threaded_irq);
也或使像是一些 helper function,例如 ilb/string.c
kernel/sched/fair.c: 像是這個 scheduler 則沒有使用EXPORT_SYMBOL()開放給其他 module or subsystem 使用
static struct task_struct *
pick_next_task_fair(struct rq *rq, struct task_struct *prev, struct rq_flags *rf)
{
	struct cfs_rq *cfs_rq = &rq->cfs;
	struct sched_entity *se;
	struct task_struct *p;
	int new_tasks;
    // [...]
}
使用
make export_report
可以列出所有被 EXPORT_SYMBOL() 的 symbol
Understanding module stacking
(base) turtlegod@thinkpad:~$ lsmod | grep vbox
vboxnetadp             28672  0
vboxnetflt             28672  0
vboxdrv               606208  2 vboxnetadp,vboxnetflt
以這個例子為例,第三個 column 是 usage count,像是 vboxdrv 要解讀為
the kernel modules displayed on the right depend on the kernel module on the left
所以也就是 vboxnetadp 有使用到 vboxdrv 的 data structure 或是 API,這時候 vboxdrv 就有了一種 library-like 的感覺
Trying out module stacking
這個例子只會使用兩個 module, 就只有單純呈現 module stacking 是可行的:
core_lkm: 這作為類似於 library 的東西user_lkm: 這個 module 會使用一些core_lkm的功能(透過EXPORT_SYMBOL())
為了要達到這個任務,我們要做到以下的一些事情:
- core 會需要利用
EXPORT_SYMBOL把一些 data 與 function 給 export 出去 - user 需要還是要利用
extern進行 declaration (definition 在 core, declaration 在 user) - 在 core 中,不幫那些 exported 的 symbol 加上
static - 修改
Makefire
現在先來看這兩個 module 所對應的兩個 .c file
ch5/modstacking/core_lkm.c
#define pr_fmt(fmt) "%s:%s(): " fmt, KBUILD_MODNAME, __func__

#include <linux/init.h>
#include <linux/module.h>
#include <linux/kernel.h>

#define MODNAME   "core_lkm"
#define THE_ONE   0xfedface
MODULE_LICENSE("Dual MIT/GPL");

int exp_int = 200;
EXPORT_SYMBOL_GPL(exp_int); // <- 這裡把 exp_int 提供出來

/* Functions to be called from other LKMs */

/* llkd_sysinfo2:
 * A more security-aware version of the earlier llkd_sysinfo() routine. We use
 * David Wheeler's flawfinder(1) tool to detect possible vulnerabilities;
 * Based on it's report, we change the strlen, and replace the strncat with
 * strlcat.
 */
void llkd_sysinfo2(void)
{
#define MSGLEN   128
    char msg[MSGLEN];

    memset(msg, 0, MSGLEN);
    snprintf(msg, 48, "%s(): minimal Platform Info:\nCPU: ", __func__);

    /* Strictly speaking, all this #if... is considered ugly and should be
     * isolated as far as is possible
     */
#ifdef CONFIG_X86
#if (BITS_PER_LONG == 32)
    strlcat(msg, "x86_32, ", MSGLEN);
#else
    strlcat(msg, "x86_64, ", MSGLEN);
#endif
#endif
#ifdef CONFIG_ARM
    strlcat(msg, "ARM-32, ", MSGLEN);
#endif
#ifdef CONFIG_ARM64
    strlcat(msg, "Aarch64, ", MSGLEN);
#endif
#ifdef CONFIG_MIPS
    strlcat(msg, "MIPS, ", MSGLEN);
#endif
#ifdef CONFIG_PPC
    strlcat(msg, "PowerPC, ", MSGLEN);
#endif
#ifdef CONFIG_S390
    strlcat(msg, "IBM S390, ", MSGLEN);
#endif

#ifdef __BIG_ENDIAN
    strlcat(msg, "big-endian; ", MSGLEN);
#else
    strlcat(msg, "little-endian; ", MSGLEN);
#endif

#if (BITS_PER_LONG == 32)
    strlcat(msg, "32-bit OS.\n", MSGLEN);
#elif(BITS_PER_LONG == 64)
    strlcat(msg, "64-bit OS.\n", MSGLEN);
#endif
    pr_info("%s", msg);

}
EXPORT_SYMBOL(llkd_sysinfo2); // <- 這裡把 llkd_sysinfo2() 提供出來

#if (BITS_PER_LONG == 32)
u32 get_skey(int p)
#else               // 64-bit
u64 get_skey(int p)
#endif
{
#if (BITS_PER_LONG == 32)
    u32 secret = 0x567def;
#else               // 64-bit
    u64 secret = 0x123abc567def;
#endif
    pr_info("%s:%d: I've been called\n", __FILE__, __LINE__);
    if (p == THE_ONE)
        return secret;
    return 0;

}
EXPORT_SYMBOL(get_skey); // <- 這裡把 get_skey() 提供出來

static int __init core_lkm_init(void)
{
    pr_info("inserted\n");
    return 0;   /* success */
}

static void __exit core_lkm_exit(void)
{
    pr_info("bids you adieu\n");
}

module_init(core_lkm_init);
module_exit(core_lkm_exit);
ch5/modstacking/user_lkm.c
#define pr_fmt(fmt) "%s:%s(): " fmt, KBUILD_MODNAME, __func__

#include <linux/init.h>
#include <linux/module.h>
#include <linux/kernel.h>

#define MODNAME     "user_lkm"
#if 1
MODULE_LICENSE("Dual MIT/GPL");
#else
MODULE_LICENSE("MIT");
#endif

extern void llkd_sysinfo2(void);
extern long get_skey(int);
extern int exp_int;

/* Call some functions within the 'core' module */
static int __init user_lkm_init(void)
{
#define THE_ONE   0xfedface
    pr_info("inserted\n");
    u64 sk = get_skey(THE_ONE);

    pr_debug("Called get_skey(), ret = 0x%llx = %llu\n", sk, sk);
    pr_debug("exp_int = %d\n", exp_int);
    llkd_sysinfo2();

    return 0;

}

static void __exit user_lkm_exit(void)
{
    pr_info("bids you adieu\n");

}

module_init(user_lkm_init);
module_exit(user_lkm_exit);
user_lkm.c 的重點在於前面還是要用 extern 做宣告才可以使用 core_lkm 所提供出來的東西
extern void llkd_sysinfo2(void);
extern long get_skey(int);
extern int exp_int;
再來看看 Makefile
ch5/modstacking/Makefile則是要多加這兩行
obj-m          := core_lkm.o
obj-m          += user_lkm.o
1. 首先使用 make 編譯
cd ~/Linux-Kernel-Programming/ch5/modstacking
make
ls *ko
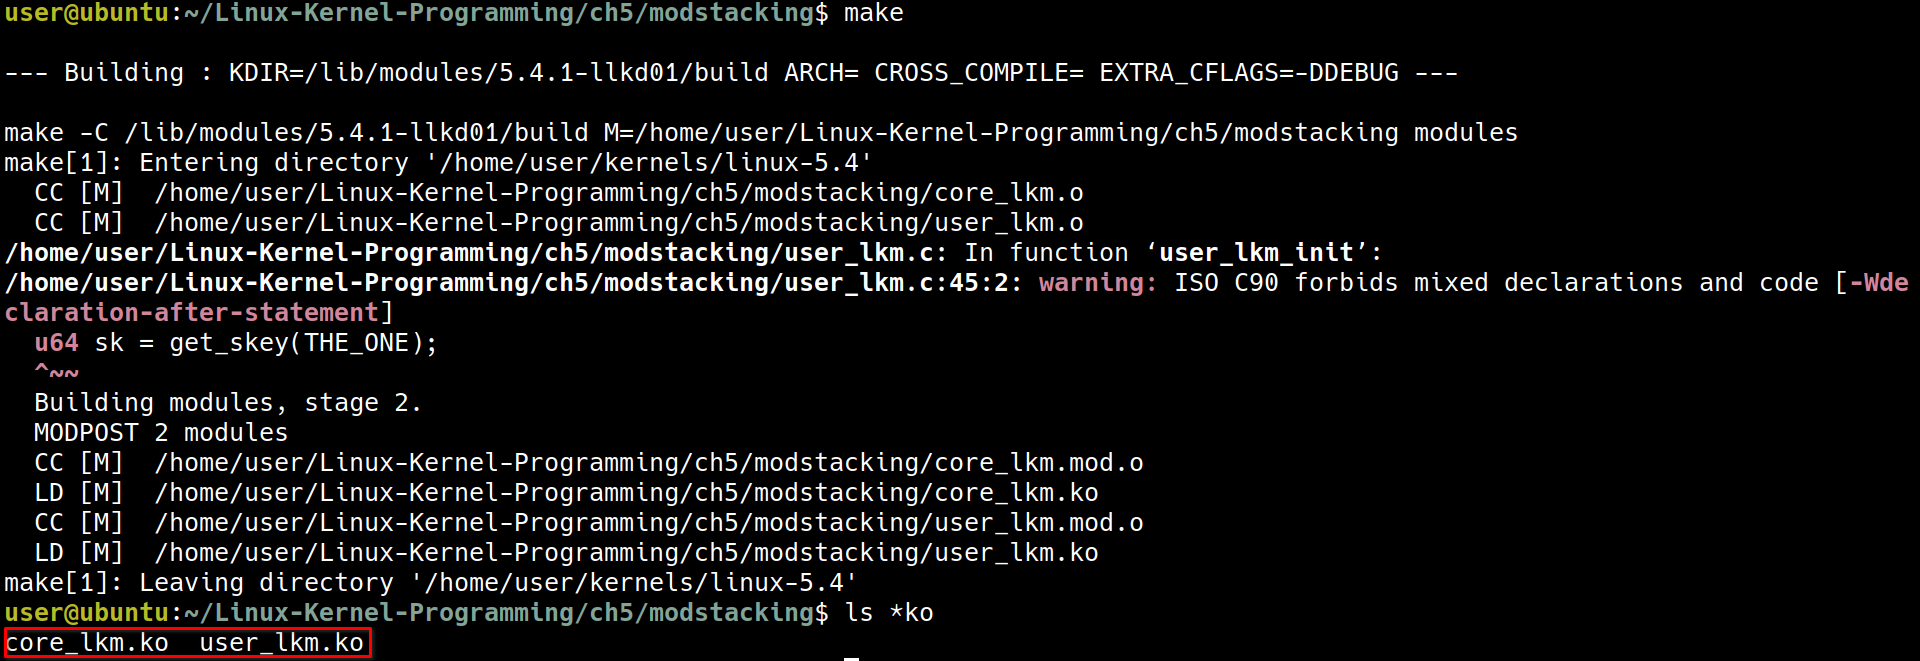 現在出現了
現在出現了 core_lkm.ko 與 user_lkm.ko
2. 直接先 insert user_lkm (會發生錯誤)
sudo dmesg -C
sudo insmod ./user_lkm.ko
dmesg
 這是因為在
這是因為在 user_lkm.c 中雖然宣告了 exp_int, get_skey, llkd_sysinfo2 這三個 symbol, 但是定義 symbol 的 core_lkm 還沒有載入,所以會出錯
3. 使用正確的順序,先 insert core_lkm 再 insert user_lkm
sudo insmod ./core_lkm.ko
dmesg
sudo insmod ./user_lkm.ko
dmesg
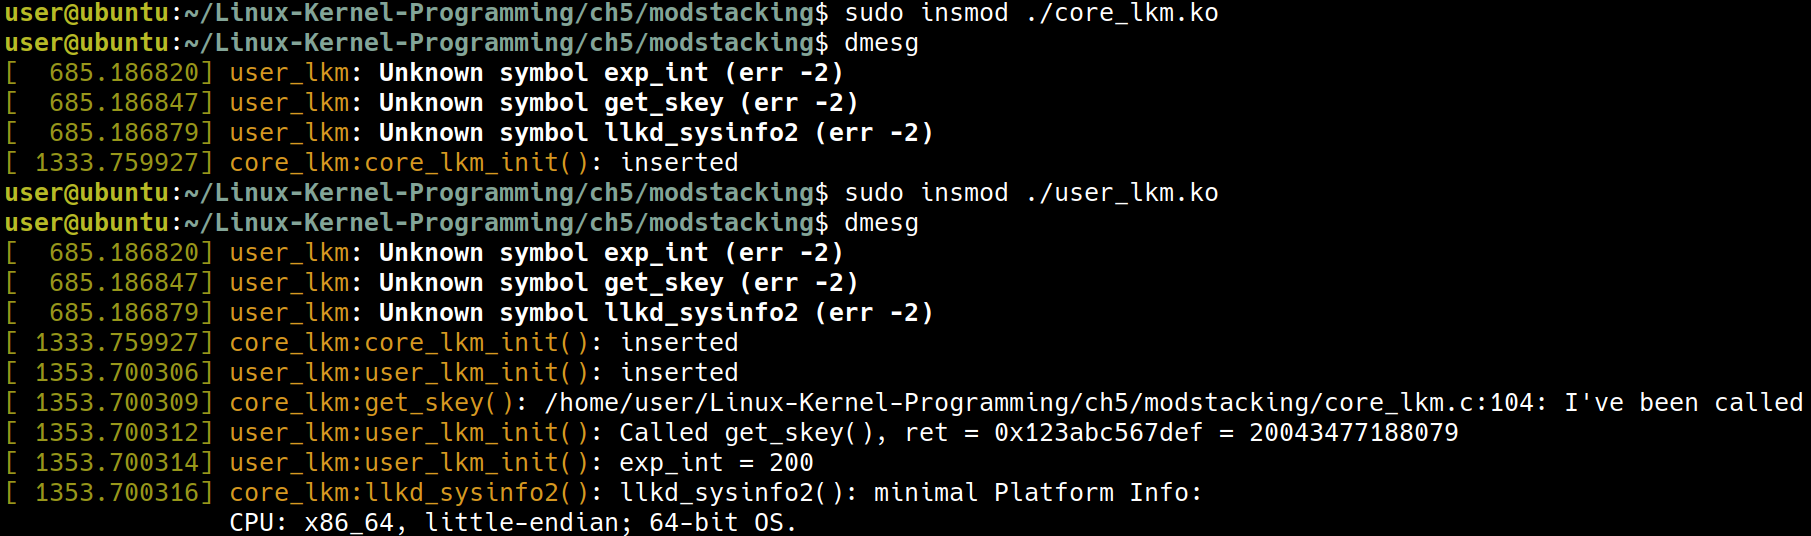 先載入
先載入 core_lkm 之後在載入 user_lkm,就可以成功把這兩個都載入進去了!
4. 運行成功了! 使用 lsmod 來確認運行狀態
lsmod | egrep "core_lkm|user_lkm"
 現在可以看到
 core 被 user 依賴
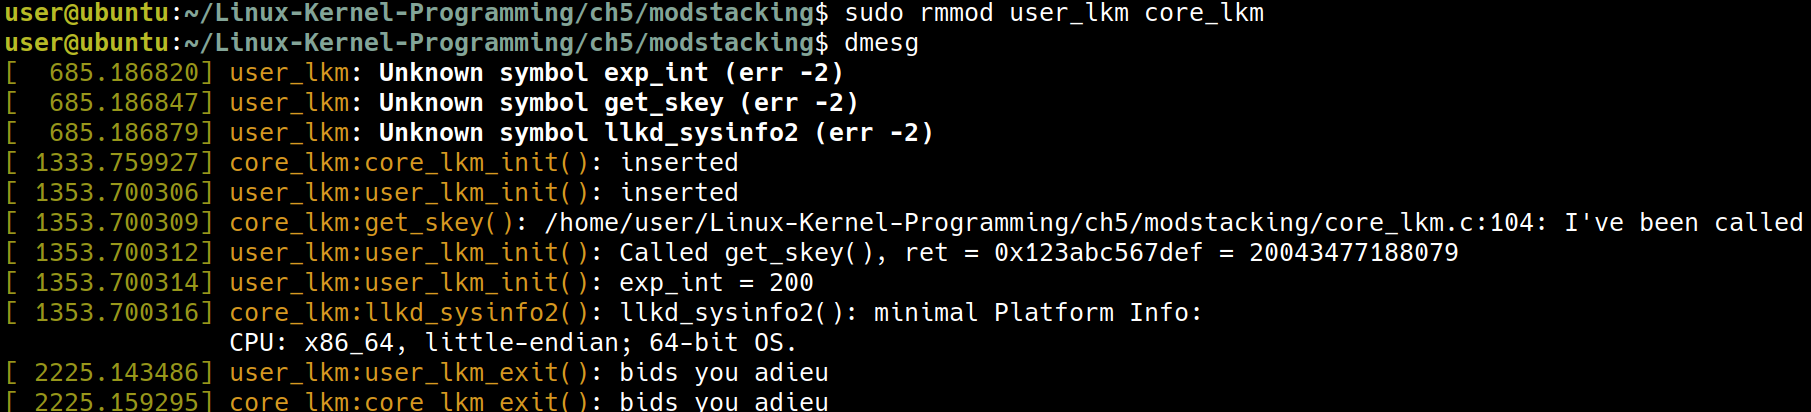
5. 來看看直接刪除掉 core_lkm 會發生什麼事情
sudo rmmod core_lkm
 因為
因為 core 被 user 依賴,所以沒辦法刪除掉
6. 使用正確的方式把這兩個 module 刪除掉
sudo rmmod user_lkm core_lkm
Passing parameters to a kernel module
到了目前為止的例子,都還沒有使用 parameter,試想我們想要做一個 log level 的功能,類似下面這種
static int debug_level; /* will be init to zero */
func_x() {
    if (debug_level >= 1)
        pr_debug("At 1\n");
    [...]
        while (<cond>) {
            if (debug_level >= 2)
                pr_debug("At 2: j=0x%x\n", j);
            [...]

        }
    [...]
}
而這裡的 debug_level 要如何用 parameter 的方式傳入?這是這節接下來要說明的事情。
Declaring and using module parameters
想要傳入 parameter 的時候,可以用這樣的方式:
sudo insmod modparams1.ko mp_debug_level=2
這裡的
mp_代表 module prefix,這是一個命名上的建議
Q: 命令上的方法了解了,但下一個問題是他並沒有 main(int argc, char **argv) 可以接收參數,那麼在程式中,又要如何接收命令上傳入的參數?
A: 使用 macro module_param()
例如 ~/Linux-Kernel-Programming/ch5/modparams/modparams1/modparams1.c:
#include <linux/init.h>
#include <linux/module.h>
#include <linux/kernel.h>

#define OUR_MODNAME    "modparams1"
MODULE_AUTHOR("Kaiwan N Billimoria");
MODULE_DESCRIPTION("LKP book:ch5/modparams/modparams1: module parameters demo LKM #1");
MODULE_LICENSE("Dual MIT/GPL");
MODULE_VERSION("0.1");

/* Module parameters */
static int mp_debug_level;
module_param(mp_debug_level, int, 0660);
MODULE_PARM_DESC(mp_debug_level,
"Debug level [0-2]; 0 => no debug messages, 2 => high verbosity");

static char *mp_strparam = "My string param";
module_param(mp_strparam, charp, 0660);
MODULE_PARM_DESC(mp_strparam, "A demo string parameter");

static int __init modparams1_init(void)
{
    pr_info("%s: inserted\n", OUR_MODNAME);
    pr_info("module parameters passed: mp_debug_level=%d mp_strparam=%s\n",
        mp_debug_level, mp_strparam);
    return 0;       /* success */

}

static void __exit modparams1_exit(void)
{
    pr_info("module parameters passed: mp_debug_level=%d mp_strparam=%s\n",
        mp_debug_level, mp_strparam);
    pr_info("%s: removed\n", OUR_MODNAME);

}

module_init(modparams1_init);
module_exit(modparams1_exit);
像是這裡的
module_param(mp_debug_level, int, 0660);
module_param(mp_strparam, charp, 0660);
這個 macro 有三個參數
- parameter 的名稱,應該要是
static的 symbol - data type
- 最後的
0660是權限,格式跟檔案權限的寫法一樣
MODULE_PARM_DESC() 讓我們可以針對參數做一些說明,使用 modinfo 可以看到這些說明
cd ~/Linux-Kernel-Programming/ch5/modparams/modparams1
make
modinfo -p ./modparams1.ko
輸出結果如下,像是這二個 description 是對應到 .c file 中的二個 MODULE_PARM_DESC()
user@ubuntu:~/Linux-Kernel-Programming/ch5/modparams/modparams1$ modinfo -p ./modparams1.ko
mp_debug_level:Debug level [0-2]; 0 => no debug messages, 2 => high verbosity (int)
mp_strparam:A demo string parameter (charp)
sudo dmesg -C
sudo insmod ./modparams1.ko
dmesg
這是沒有傳入任何參數的情況:

現在來看看傳入參數的情況:
sudo rmmod modparams1
sudo insmod ./modparams1.ko mp_debug_level=2 mp_strparam=\"Hello modparams1\"
dmesg
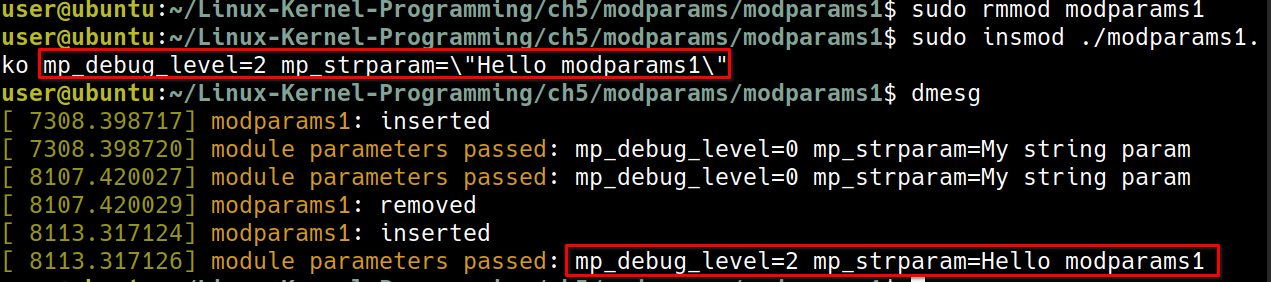 這裡可以看到參數有成功傳入進去了
Getting/setting module parameters after insertion
藉由這裡的操作,我們可以對於 moduel 做一些動態的操作
在 /sys/module/modparams1/ 這裡可以看到這個 module 的參數
ls /sys/module/modparams1/
ls -l /sys/module/modparams1/parameters/

 (程式碼中的
 0660, 會對應到這裡的 -rw-rw----)
sudo bash -c "echo 0 > /sys/module/modparams1/parameters/mp_debug_level"
sudo cat /sys/module/modparams1/parameters/mp_debug_level

Module parameter data types and validation
Validating kernel module parameters
Overriding the module parameter’s name
Hardware-related kernel parameters
Floating point not allowed in the kernel
一般來說在 kernel 中是不支援 floating point 的
Auto-loading modules on system boot
使用這裡的作法可以讓 module auto-loading
先看一下 Makefile 中的
install:
    @echo
    @echo "--- installing ---"
    @echo " [First, invoke the 'make' ]"
    make
    @echo
    @echo " [Now for the 'sudo make install' ]"
    sudo make -C $(KDIR) M=$(PWD) modules_install
    sudo depmod
主要是這裡的 sudo make -C $(KDIR) M=$(PWD) modules_install 負責做到把 module 變 auto-loading 的任務
cd ~/Linux-Kernel-Programming/ch5/min_sysinfo
make && sudo make install
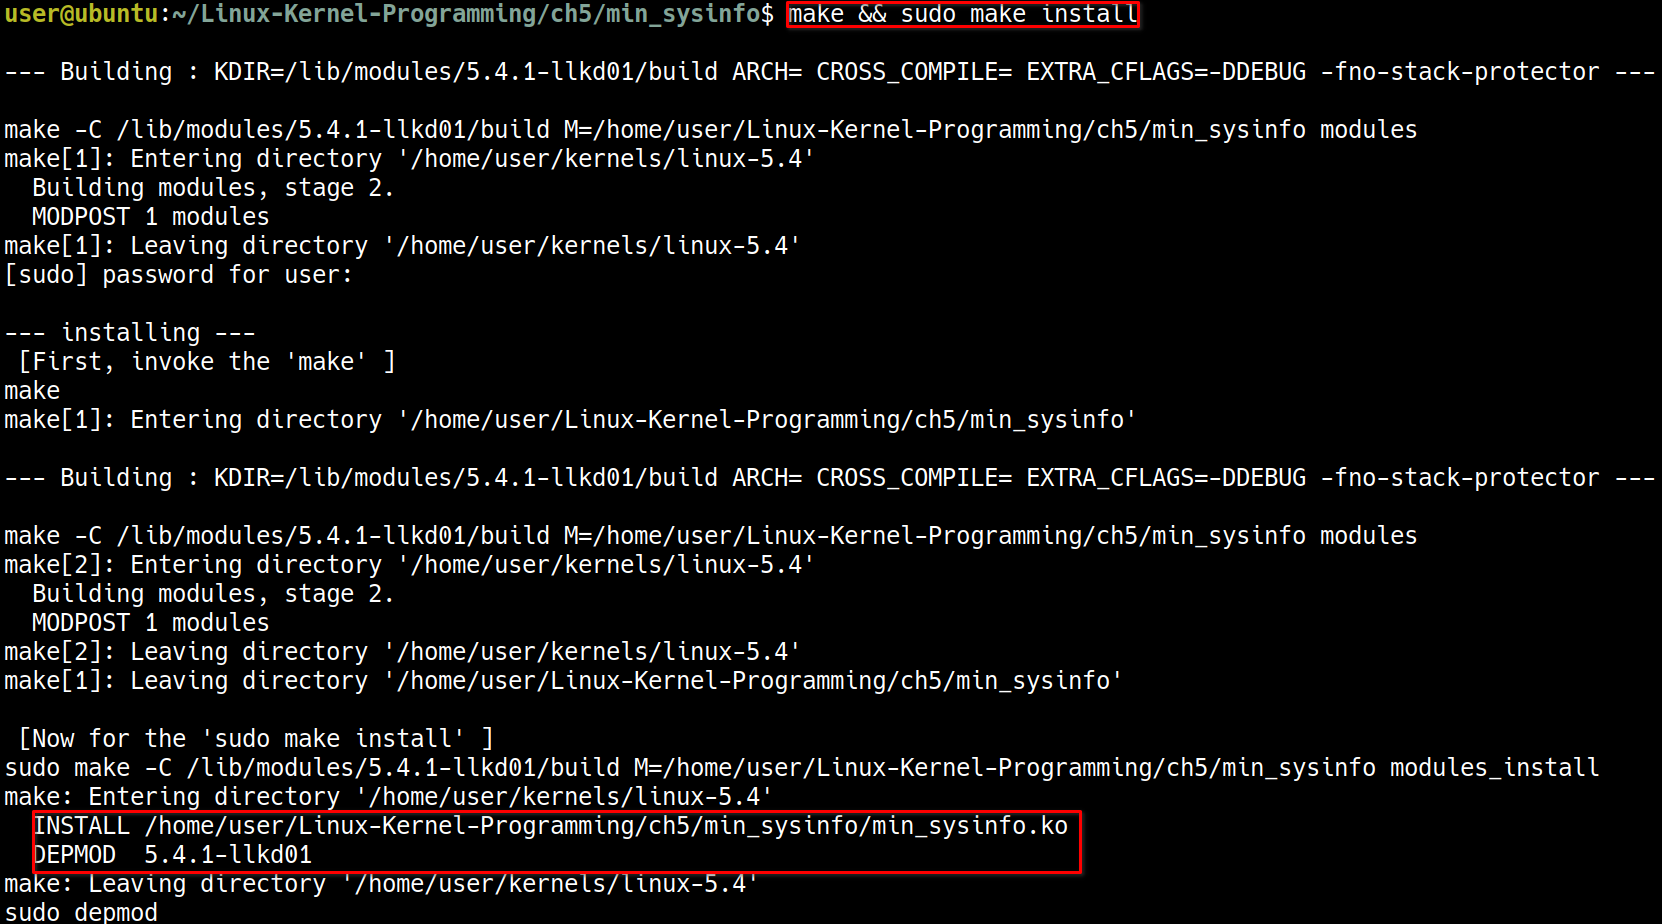
ls -l /lib/modules/5.4.1-llkd01/extra/
輸出:
user@ubuntu:~/Linux-Kernel-Programming/ch5/min_sysinfo$ ls -l /lib/modules/5.4.1-llkd01/extra/
total 228
-rw-r--r-- 1 root root 233409 Feb 27 04:18 min_sysinfo.ko
depmod 是一個工具,可以處理 module 之間的 dependency 的問題,也可以用這個工具來查看剛剛 make install 的效果
sudo depmod --dry-run | grep min_sysinfo

cat /etc/modules-load.d/min_sysinfo.conf
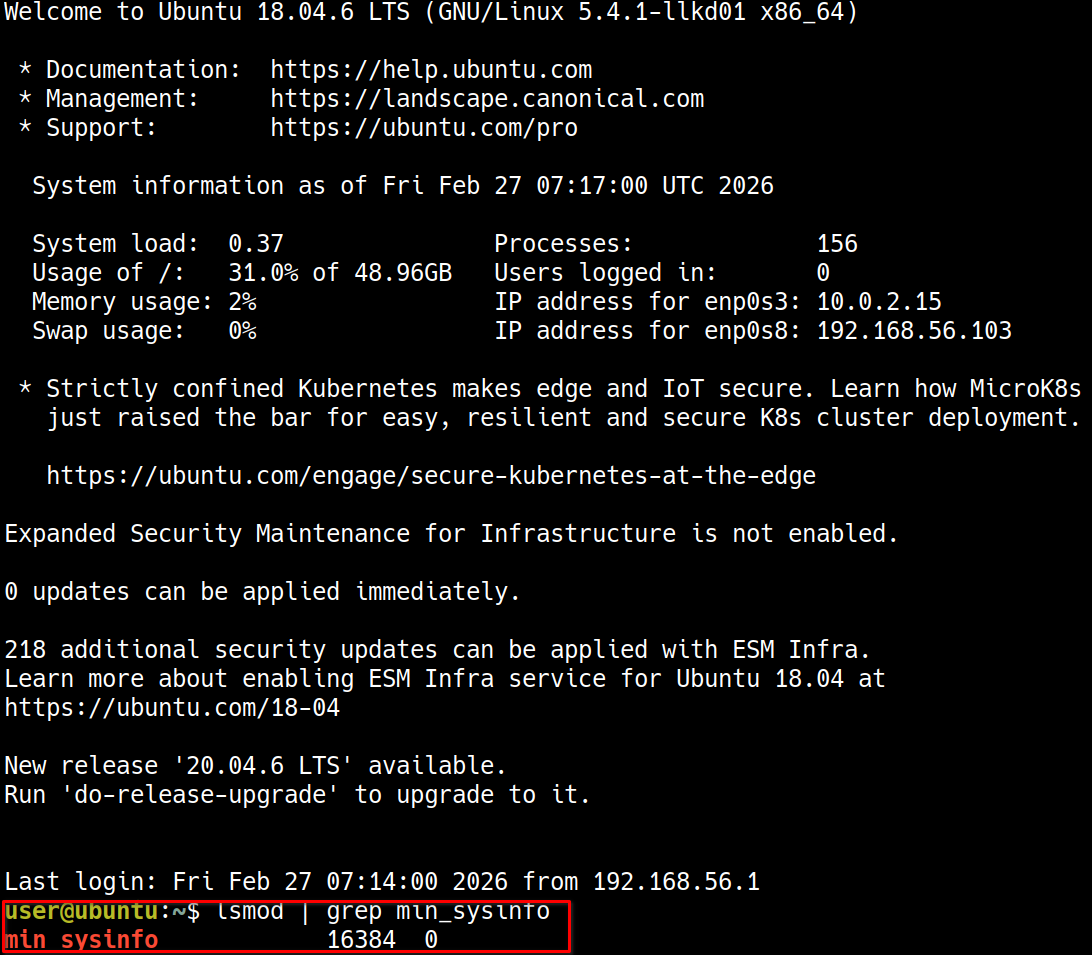
最後重新開機
sync; sudo reboot
lsmod | grep min_sysinfo
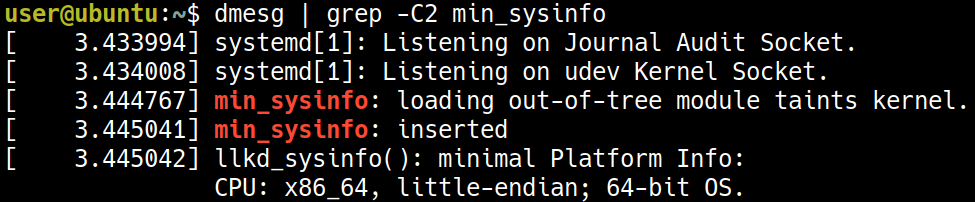
user@ubuntu:~$ dmesg | grep -C2 min_sysinfo
[    3.433994 ] systemd[1]: Listening on Journal Audit Socket.
[    3.434008 ] systemd[1]: Listening on udev Kernel Socket.
[    3.444767 ] min_sysinfo: loading out-of-tree module taints kernel.
[    3.445041 ] min_sysinfo: inserted
[    3.445042 ] llkd_sysinfo(): minimal Platform Info:
               CPU: x86_64, little-endian; 64-bit OS.