Understanding the VM split
Linux kernel 管理記憶體時有一下兩種方式
- virtual memory-based (通常是使用這種方式)
- 直接以 physical memory 的觀點去處理
這個章節會先討論 virtual memory 的方式,接著再討論 physical memory 的方式
- 在 32-bit processor 上,VAS 的範圍為 0 ~ 2 ^ 32 = 4GB
- 在 64-bit processor 上,VAS 的範圍為 0 ~ 2 ^ 64 = 4EB
為了討論方便,這裡會先使用 32-bit 的方式
Looking under the hood – the Hello, world C program
這裡在說明像是在這樣的 helloworld.c 中,printf() 是透過 loader 呼叫 system call mmap(),讓 printf() 可以被 map 到這個 process 的 VAS 中。
#include <stdio.h>

int main()
{
    printf("Hello, world\n");
}
user@ubuntu:~/tmp$ gcc helloworld.c -o helloworld
user@ubuntu:~/tmp$ ./helloworld
Hello, world
user@ubuntu:~/tmp$ ldd ./helloworld
        linux-vdso.so.1 (0x00007ffe497dd000)
        libc.so.6 => /lib/x86_64-linux-gnu/libc.so.6 (0x00007fd88850d000)
        /lib64/ld-linux-x86-64.so.2 (0x00007fd888b00000)
從這裡可以看到這個 ./helloword link 到了 glibc (GNU libc) 函式庫,這裡面會包含 printf()
這裡有以下幾個重點
- 每一個 process 都會 link 到至少兩個 object: 1.
glibc, 2. program loader - 在上面的例子中,loader 為
ld-linux-x86-64.so.2 libc被 map 到 VAS 中的0x00007fd88850d000
Going beyond the printf() API
這裡要探討的主題為 VM split,是在說 kernel space 與 user space 是共用一個 VAS 的,像是下圖這樣:
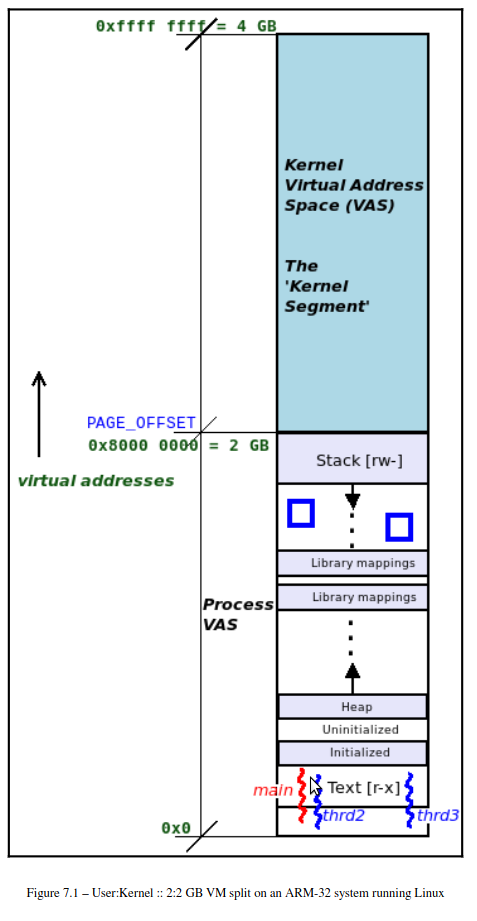
這裡的 kernel : user 的比例是個可以做設定的,在 make [ARCH=xxx] menuconfig 的時候可以做決定
在 64-bit 的架構上沒有辦法直接配置 VM split 的比例,現在在講的只是 32-bit 的架構,接下來要說明 64-bit 的架構要如何做到 VM split
VM split on 64-bit Linux systems
首先在 64-bit 的系統上面,並不是全部的 64-bit 都拿來作為 addressing 用,實際上只使用 48-bit 用來 addressing,因為直接使用 64-bit 的話,實在是太大了。
Virtual addressing and address translation
考量這個程式碼片段:
int i = 5;
printf("address of i is 0x%x\n", &i);
- 如果是在 user space process 執行,看到的會是一個 User Virtual Address (UVA)
- 如果是在 kernel space process 執行(使用
printk()),看到的會是一個 Kernel Virtual Address (KVA)
 (64-bit 的架構之下,只使用 48 個 bit)
對應前面說的兩個情況,在這張圖中,也可以看到兩個情況
- bit [63 ~ 48] 都設為 1 : UVA
- bit [63 ~ 48] 都設為 1 : KVA
這裡想要強調的重點在於,virtual memory 包含了一些 bitmap,並不是只有 address 的部份,這個跟 xv6 中的 virtual memory 是一樣的。
現在的 64-bit 架構的 memeor 切分是當初 AMD 的工程是把 Linux 移植到 64-bit 架構時決定的,最後的決定結果為
- 48-bit addressing with a 4 KB page size
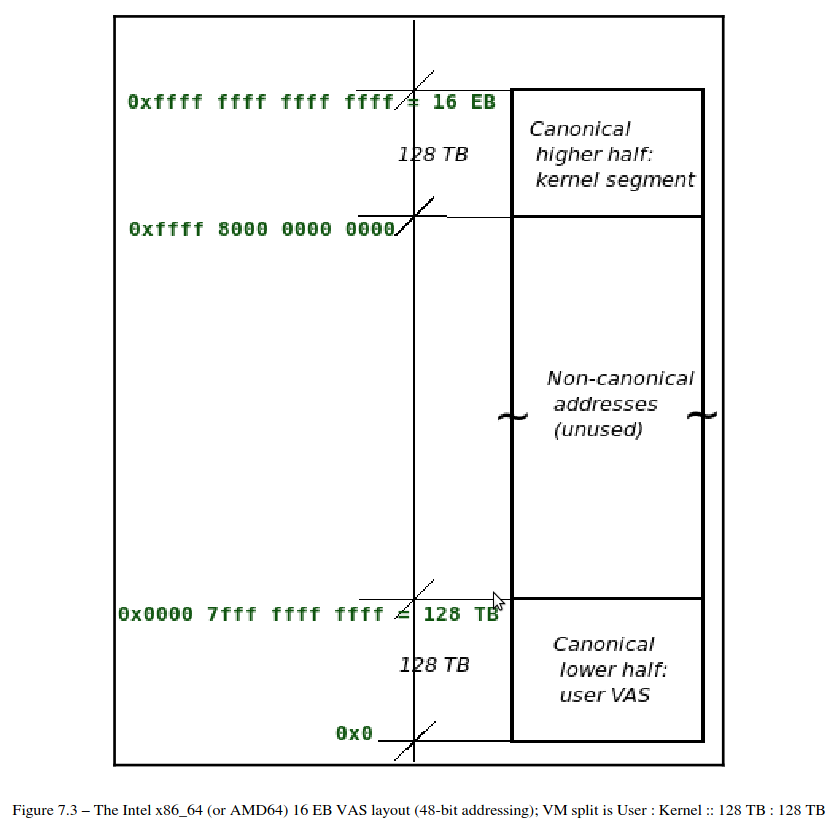 這張圖在顯示 virtual address 中,KVA 與 UVA 的範圍,這也對應到了為什麼透過第 63~48 bit 可以辨識是 UVA 還是 KVA,並且也可以注意到,中間空了好大的範圍是沒有用到的。
 這張圖顯示了不同架構下的 VM split 的比例
The process VAS – the full view
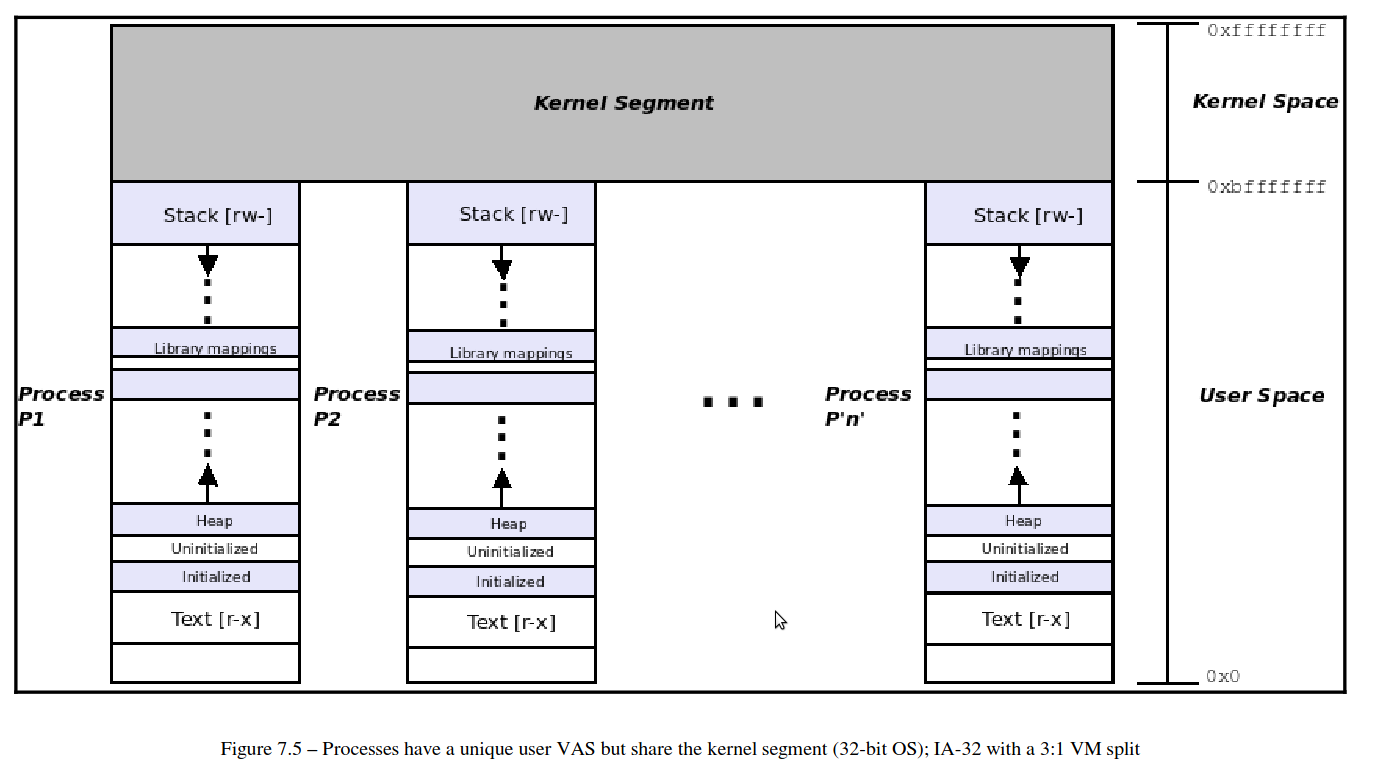 這張圖顯示的是 32-bit 架構的 VMS 的配置與 VM split,並且這裡
 user : kernel 的比例為 3 : 1
接下來會介紹 procmap 這個工具,可以把 VM split 顯示成像是上圖那個樣子
Examining the process VAS
這裡在講一些 proc filesystem (procfs) 的用處
Examining the user VAS in detail
procfs 可以利用 pseudo-file /proc/PID/maps 去取得這個 process 的 VAS 資訊,實際使用上有兩種方法:
- 直接使用
procfs - 使用一些 useful frontends (人類比較方便讀懂的方法)
Directly viewing the process memory map using procfs
可以直接使用 cat 去看 procfs,像是
cat /proc/self/maps
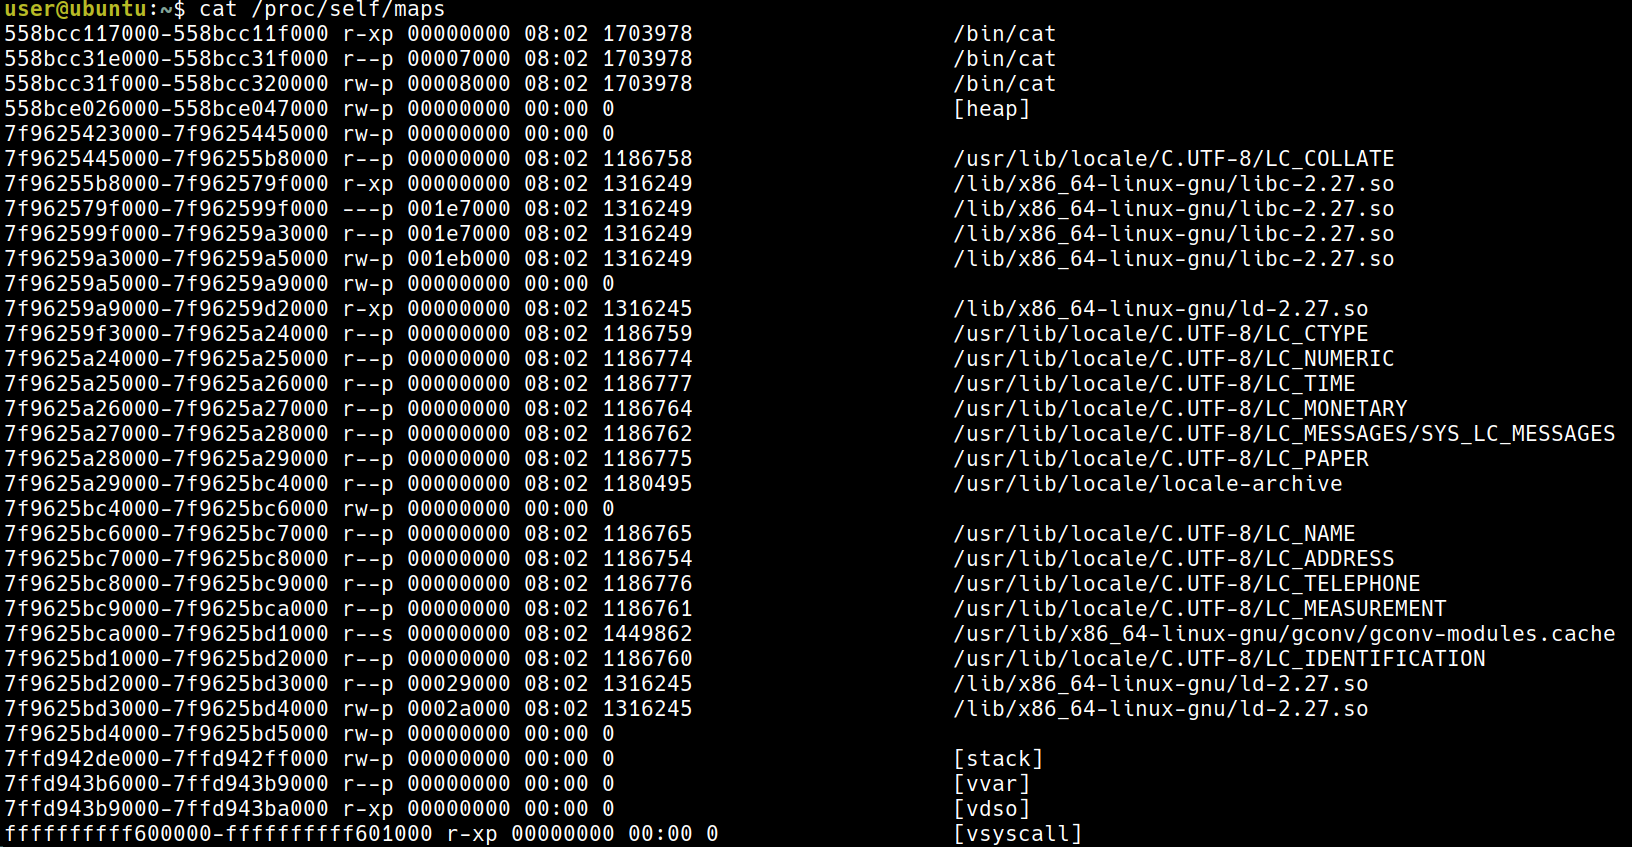
Interpreting the /proc/PID/maps output
這裡來解讀 cat /proc/self/maps 的輸出結果,每一行都代表一個 segment 或是一個 VAS,以這一行來說明:
start_uva - end_uva       mode,mapping start-off mj:mn inode# image-name
555d83b65000-555d83b6d000 r-xp         00000000  08:01 524313 /bin/cat
The vsyscall page
這裡在說最後的 vsyscall 看起來像是 kernel address,這是一個加速用的 mapping
Frontends to view the process memory map
pmap 與 smem 可以用更好的方式
The procmap process VAS visualization utility
這裡要看這個 repo:
https://github.com/kaiwan/procmap.git
git clone https://github.com/kaiwan/procmap
cd procmap
sudo ./install_procmap
./procmap
./procmap --pid=$(pgrep bash)
Understanding VMA basics
在 /proc/PID/maps 的 output 中,每一行都代表著一個 VMA:
user@ubuntu:~$ cat /proc/self/maps
55cafa4b2000-55cafa4ba000 r-xp 00000000 08:02 1703978                    /bin/cat
55cafa6b9000-55cafa6ba000 r--p 00007000 08:02 1703978                    /bin/cat
55cafa6ba000-55cafa6bb000 rw-p 00008000 08:02 1703978                    /bin/cat
55cafc3ce000-55cafc3ef000 rw-p 00000000 00:00 0                          [heap]
7fc71737c000-7fc71739e000 rw-p 00000000 00:00 0
7fc71739e000-7fc717511000 r--p 00000000 08:02 1186758                    /usr/lib/locale/C.UTF-8/LC_COLLATE
7fc717511000-7fc7176f8000 r-xp 00000000 08:02 1316249                    /lib/x86_64-linux-gnu/libc-2.27.so
7fc7176f8000-7fc7178f8000 ---p 001e7000 08:02 1316249                    /lib/x86_64-linux-gnu/libc-2.27.so
7fc7178f8000-7fc7178fc000 r--p 001e7000 08:02 1316249                    /lib/x86_64-linux-gnu/libc-2.27.so
7fc7178fc000-7fc7178fe000 rw-p 001eb000 08:02 1316249                    /lib/x86_64-linux-gnu/libc-2.27.so
7fc7178fe000-7fc717902000 rw-p 00000000 00:00 0
7fc717902000-7fc71792b000 r-xp 00000000 08:02 1316245                    /lib/x86_64-linux-gnu/ld-2.27.so
7fc71794c000-7fc71797d000 r--p 00000000 08:02 1186759                    /usr/lib/locale/C.UTF-8/LC_CTYPE
7fc71797d000-7fc71797e000 r--p 00000000 08:02 1186774                    /usr/lib/locale/C.UTF-8/LC_NUMERIC
7fc71797e000-7fc71797f000 r--p 00000000 08:02 1186777                    /usr/lib/locale/C.UTF-8/LC_TIME
7fc71797f000-7fc717980000 r--p 00000000 08:02 1186764                    /usr/lib/locale/C.UTF-8/LC_MONETARY
7fc717980000-7fc717981000 r--p 00000000 08:02 1186762                    /usr/lib/locale/C.UTF-8/LC_MESSAGES/SYS_LC_MESSAGES
7fc717981000-7fc717982000 r--p 00000000 08:02 1186775                    /usr/lib/locale/C.UTF-8/LC_PAPER
7fc717982000-7fc717b1d000 r--p 00000000 08:02 1180495                    /usr/lib/locale/locale-archive
像是這樣的一個 VMA 會對應到 vm_area_struct,被定義在 mm_types.h
vim ${KSRC}/include/linux/mm_types.h
struct vm_area_struct {
    /* The first cache line has the info for VMA tree walking. */

    unsigned long vm_start;     /* Our start address within vm_mm. */
    unsigned long vm_end;       /* The first byte after our end address
                       within vm_mm. */

    /* linked list of VM areas per task, sorted by address */
    struct vm_area_struct *vm_next, *vm_prev;

    struct rb_node vm_rb;

    [...]

    struct mm_struct *vm_mm;    /* The address space we belong to. */
    pgprot_t vm_page_prot;      /* Access permissions of this VMA. */
    unsigned long vm_flags;     /* Flags, see mm.h. */

    [...]
    /* Function pointers to deal with this struct. */
    const struct vm_operations_struct *vm_ops;

    /* Information about our backing store: */
    unsigned long vm_pgoff;     /* Offset (within vm_file) in PAGE_SIZE
                       units */
    struct file * vm_file;      /* File we map to (can be NULL). */
    [...]

} __randomize_layout;
Examining the kernel segment
如同先前提到的,每一個 process 都有各自的 VAS 但他們都共享同一個 kernel segment,kernel segment 非常的 arch (CPU)-dependent 但是都有一點相似,以下是 x86_32 with a 3:1 VM split
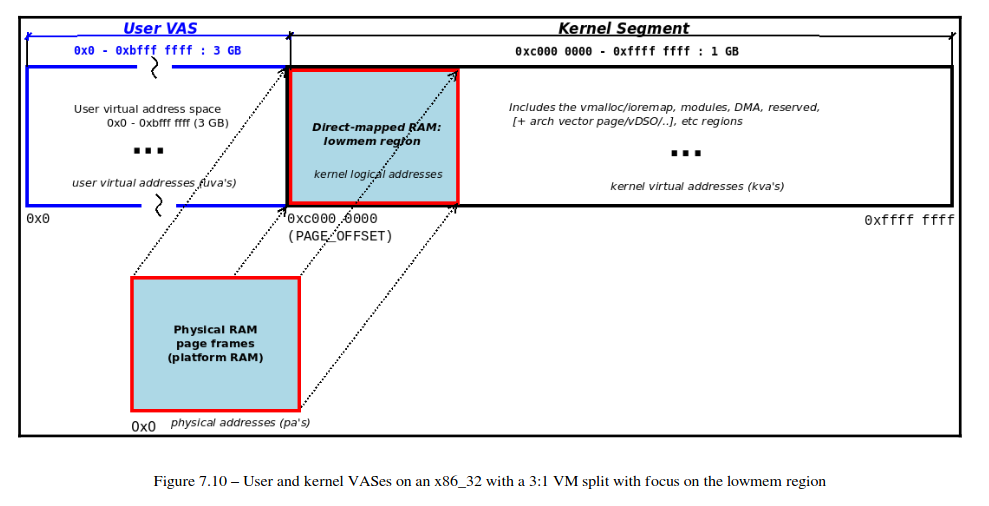
- User VAS:
0x0 ~ 0xbfff ffff(3 GB) 這裡可以自己用紙筆算一下比較有感覺 - Kernel VAS:
0xc000 0000 ~ 0xffff ffff(4 GB) - The lowmem region
PAGE_OFFSET = 0xcfff ffff(again, this is arch-dependent)Physical Address = Logical Address - PAGE_OFFSET
- The kernel vmalloc region:這在 Ch8, Ch9 會講更多 The kernel modules space:這是 Loadable Kernel Modules 的 static text and data 的區域
High memory on 32-bit systems
這個頁面在介紹 highmem 的概念
https://www.kernel.org/doc/Documentation/vm/highmem.txt
主要是在說在上面那個圖上,kernel 只有 1 GB 的空間,可是如果 memory 有 1 GB 以上該怎麼辦?會有一些 mapping 的 function 可以去做管理。
Viewing kernel documentation on the memory layout
vim ${KSRC}/Documentation/arm/memory.rst
vim ${KSRC}/Documentation/arm64/memory.rst
vim ${KSRC}/Documentation/x86/x86_64/mm.rst