Lab 連結: Lab: system calls
大綱
- xv6 有哪些 system call,以及他們的作用為何 ?
- 以程式碼的觀點來理解 xv6 的 system call 流程
- Using gdb
- System call tracing
1. xv6 有哪些 system call,以及他們的作用為何 ?
0. kernel/syscall.h 定義 syste mcall 的編號
// System call numbers
#define SYS_fork    1
#define SYS_exit    2
#define SYS_wait    3
#define SYS_pipe    4
#define SYS_read    5
#define SYS_kill    6
#define SYS_exec    7
#define SYS_fstat   8
#define SYS_chdir   9
#define SYS_dup    10
#define SYS_getpid 11
#define SYS_sbrk   12
#define SYS_sleep  13
#define SYS_uptime 14
#define SYS_open   15
#define SYS_write  16
#define SYS_mknod  17
#define SYS_unlink 18
#define SYS_link   19
#define SYS_mkdir  20
#define SYS_close  21
2. 以程式碼的觀點來理解 xv6 的 system call 流程
以下使用 user/cat.c 為例,來探討 xv6 的 system call 流程,流程中有 3 大步驟
user/cat.c:呼叫read()user/user.h用 C 語言宣告read()user/usys.S用組與實作read()- 組語
li a7, SYS_read把 read 的編號丟到 registera7裡 ecall會連接到第2步驟
- 組語
kernel/syscall.c的syscall()- 藉由 register
a7的內容得知現在要執行sys_read()
- 藉由 register
kernel/sysfile.c的sys_read()- 實際上的 system call 實作
1. user/cat.c:呼叫 read()
// user/cat.c
#include "user/user.h"

void
cat(int fd)
{
  int n;

  while((n = read(fd, buf, sizeof(buf))) > 0) { // read() 需要呼叫到 system call
    if (write(1, buf, n) != n) {
      fprintf(2, "cat: write error\n");
      exit(1);
    }
  }
  if(n < 0){
    fprintf(2, "cat: read error\n");
    exit(1);
  }
}
請注意這裡的 read() 雖然在 user/user.h 中有宣告
// user/user.h
int read(int, void*, int);
但是 read() 並沒有被 C 語言實作出來,
而是利用 user/usys.pl 這個腳本產生出來的組合語言 user/usys.S
.global read
read:
 li a7, SYS_read   # 把 read 的編號丟到 register a7 裡
 ecall             # 進入 kernel mode 並且跑到步驟 2 執行
 ret
2. kernel/syscall.c 的 syscall()
syscalls 這個 array 的宣告比較少見,可以參考 [C 語言筆記–Day14] pointer, function, array 同時出現在一行宣告時該如何解讀
// system 的宣告,實作位於 kernel/sysproc.c 以及 kernel/sysfile.c
extern uint64 sys_fork(void);
extern uint64 sys_exit(void);
extern uint64 sys_wait(void);
extern uint64 sys_pipe(void);
extern uint64 sys_read(void);
extern uint64 sys_kill(void);
extern uint64 sys_exec(void);
extern uint64 sys_fstat(void);
extern uint64 sys_chdir(void);
extern uint64 sys_dup(void);
extern uint64 sys_getpid(void);
extern uint64 sys_sbrk(void);
extern uint64 sys_sleep(void);
extern uint64 sys_uptime(void);
extern uint64 sys_open(void);
extern uint64 sys_write(void);
extern uint64 sys_mknod(void);
extern uint64 sys_unlink(void);
extern uint64 sys_link(void);
extern uint64 sys_mkdir(void);
extern uint64 sys_close(void);

// syscalls 應該要被解讀為
// array of
// pointers to
// function with no arguments
// returning uint64
static uint64 (*syscalls[])(void) = {
[SYS_fork]    sys_fork,
[SYS_exit]    sys_exit,
[SYS_wait]    sys_wait,
[SYS_pipe]    sys_pipe,
[SYS_read]    sys_read,
[SYS_kill]    sys_kill,
[SYS_exec]    sys_exec,
[SYS_fstat]   sys_fstat,
[SYS_chdir]   sys_chdir,
[SYS_dup]     sys_dup,
[SYS_getpid]  sys_getpid,
[SYS_sbrk]    sys_sbrk,
[SYS_sleep]   sys_sleep,
[SYS_uptime]  sys_uptime,
[SYS_open]    sys_open,
[SYS_write]   sys_write,
[SYS_mknod]   sys_mknod,
[SYS_unlink]  sys_unlink,
[SYS_link]    sys_link,
[SYS_mkdir]   sys_mkdir,
[SYS_close]   sys_close,
};

void
syscall(void)     // cat.c 呼叫 read() ,read() 執行組語 ecall 之後會跑來這裡執行
{                 // 原因要到 lab trap 才會說明,目前只需要知道他會跑來這裡就可以了
  int num;
  struct proc *p = myproc();

  num = p->trapframe->a7;
  if(num > 0 && num < NELEM(syscalls) && syscalls[num]) {
    // Use num to lookup the system call function for num, call it,
    // and store its return value in p->trapframe->a0
    p->trapframe->a0 = syscalls[num]();   // 這裡是在呼叫 kernel/sysfile.c 的 sysr_read()
  } else {
    printf("%d %s: unknown sys call %d\n",
            p->pid, p->name, num);
    p->trapframe->a0 = -1;
  }
}
3. kernel/sysfile.c 的 sys_read()
system call 本身的實作,systemcall
uint64
sys_read(void) // 由步驟 2 呼叫而到這裡執行
{
  struct file *f;
  int n;
  uint64 p;

  argaddr(1, &p);
  argint(2, &n);
  if(argfd(0, 0, &f) < 0)
    return -1;
  return fileread(f, p, n);
}
Using gdb (easy)
這個題目是 2022 年的版本才有出現的,目的在於熟悉 gdb 的操作
用 gdb-multiarch debug xv6 的方式
這裡會需要開啟 2 個終端機 先在其中一個終端機輸入
make qemu-gdb
在另一個終端機輸入
gdb-multiarch
第一次執行 gdb-multiarch 時,可能會出現
To enable execution of this file add
        add-auto-load-safe-path <path>/xv6-labs-2022/.gdbinit
line to your configuration file "<home path>/.gdbinit".
就照著他的指示修改你的 ~/.gdbinit 接著在重新 make qemu-gdb 與 gdb-multiarch 就可以了。
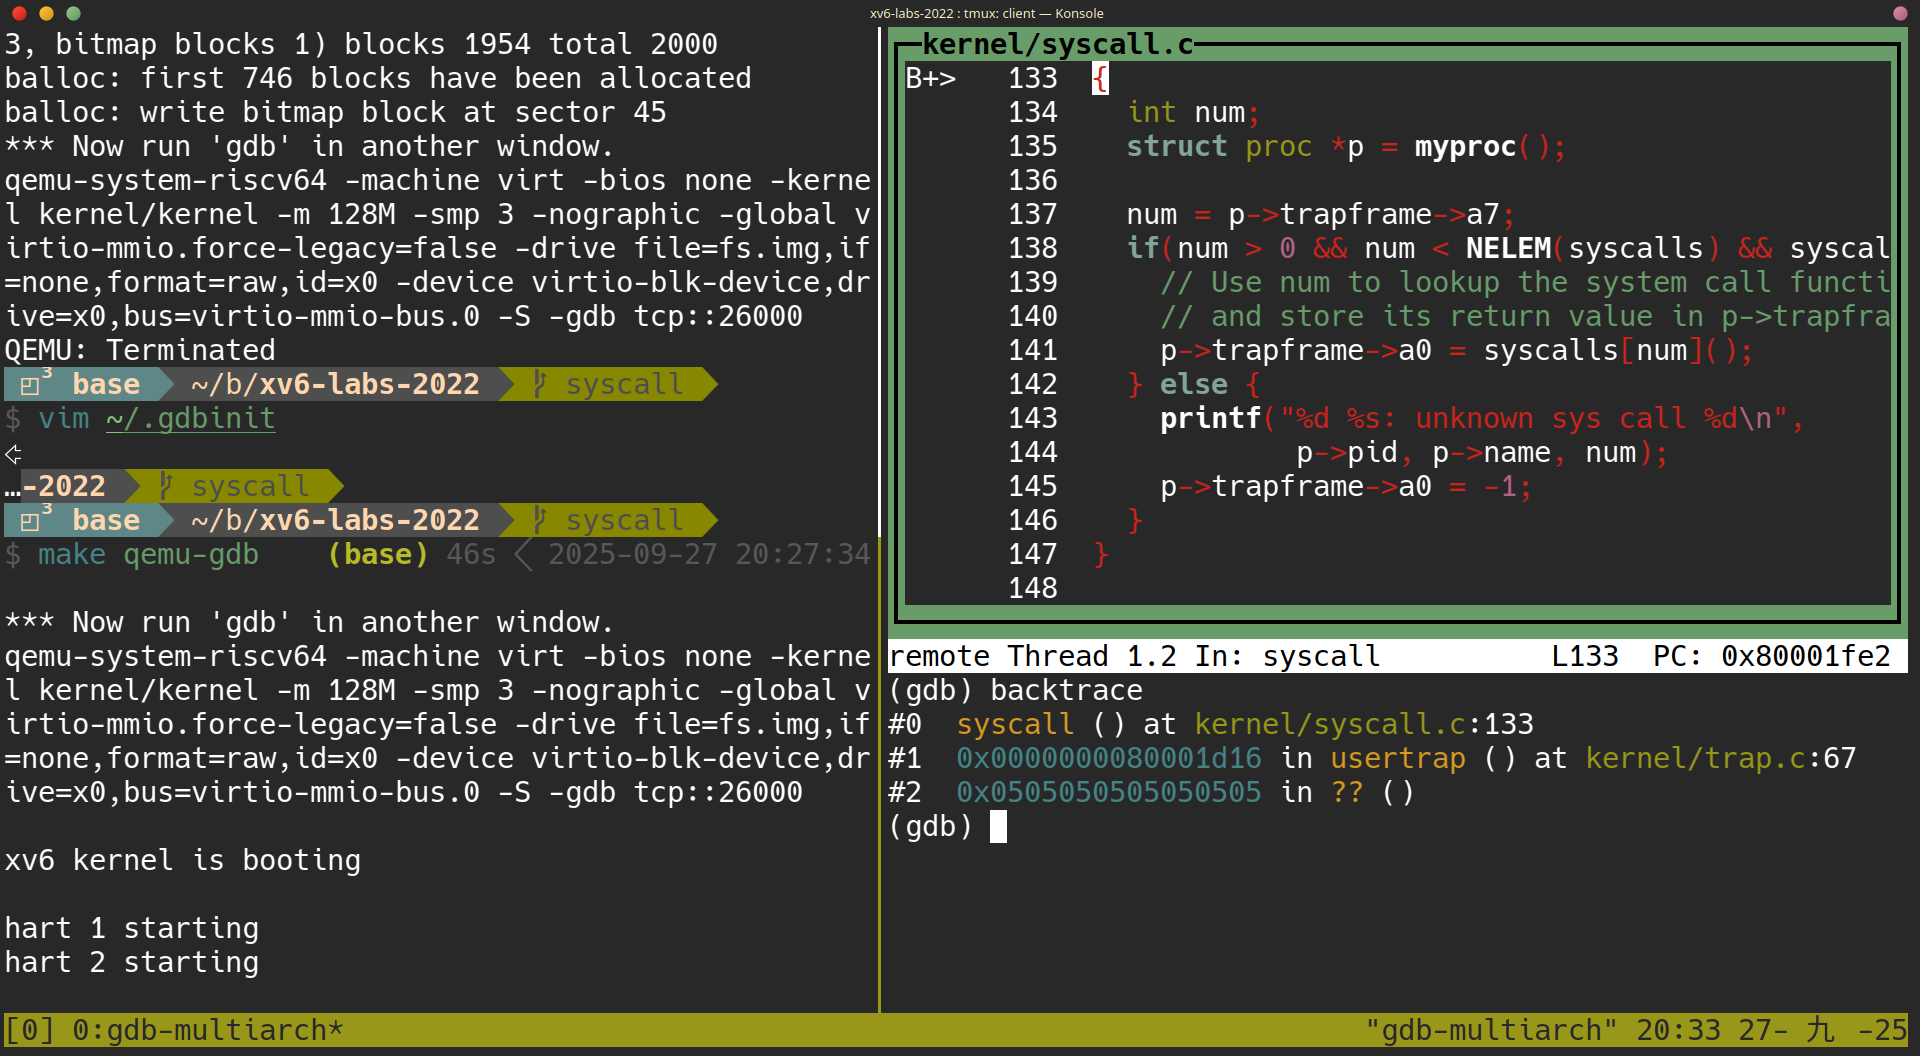
呼叫到 syscall() 的 function
在 gdb-multiarch 的終端機中,執行:
(gdb) b syscall
(gdb) c
(gdb) layout src
(gdb) backtrace
Looking at the backtrace output, which function called syscall?
答案: 直接看執行的結果,可得知是在 usertrap() at kernel/trap.c:67
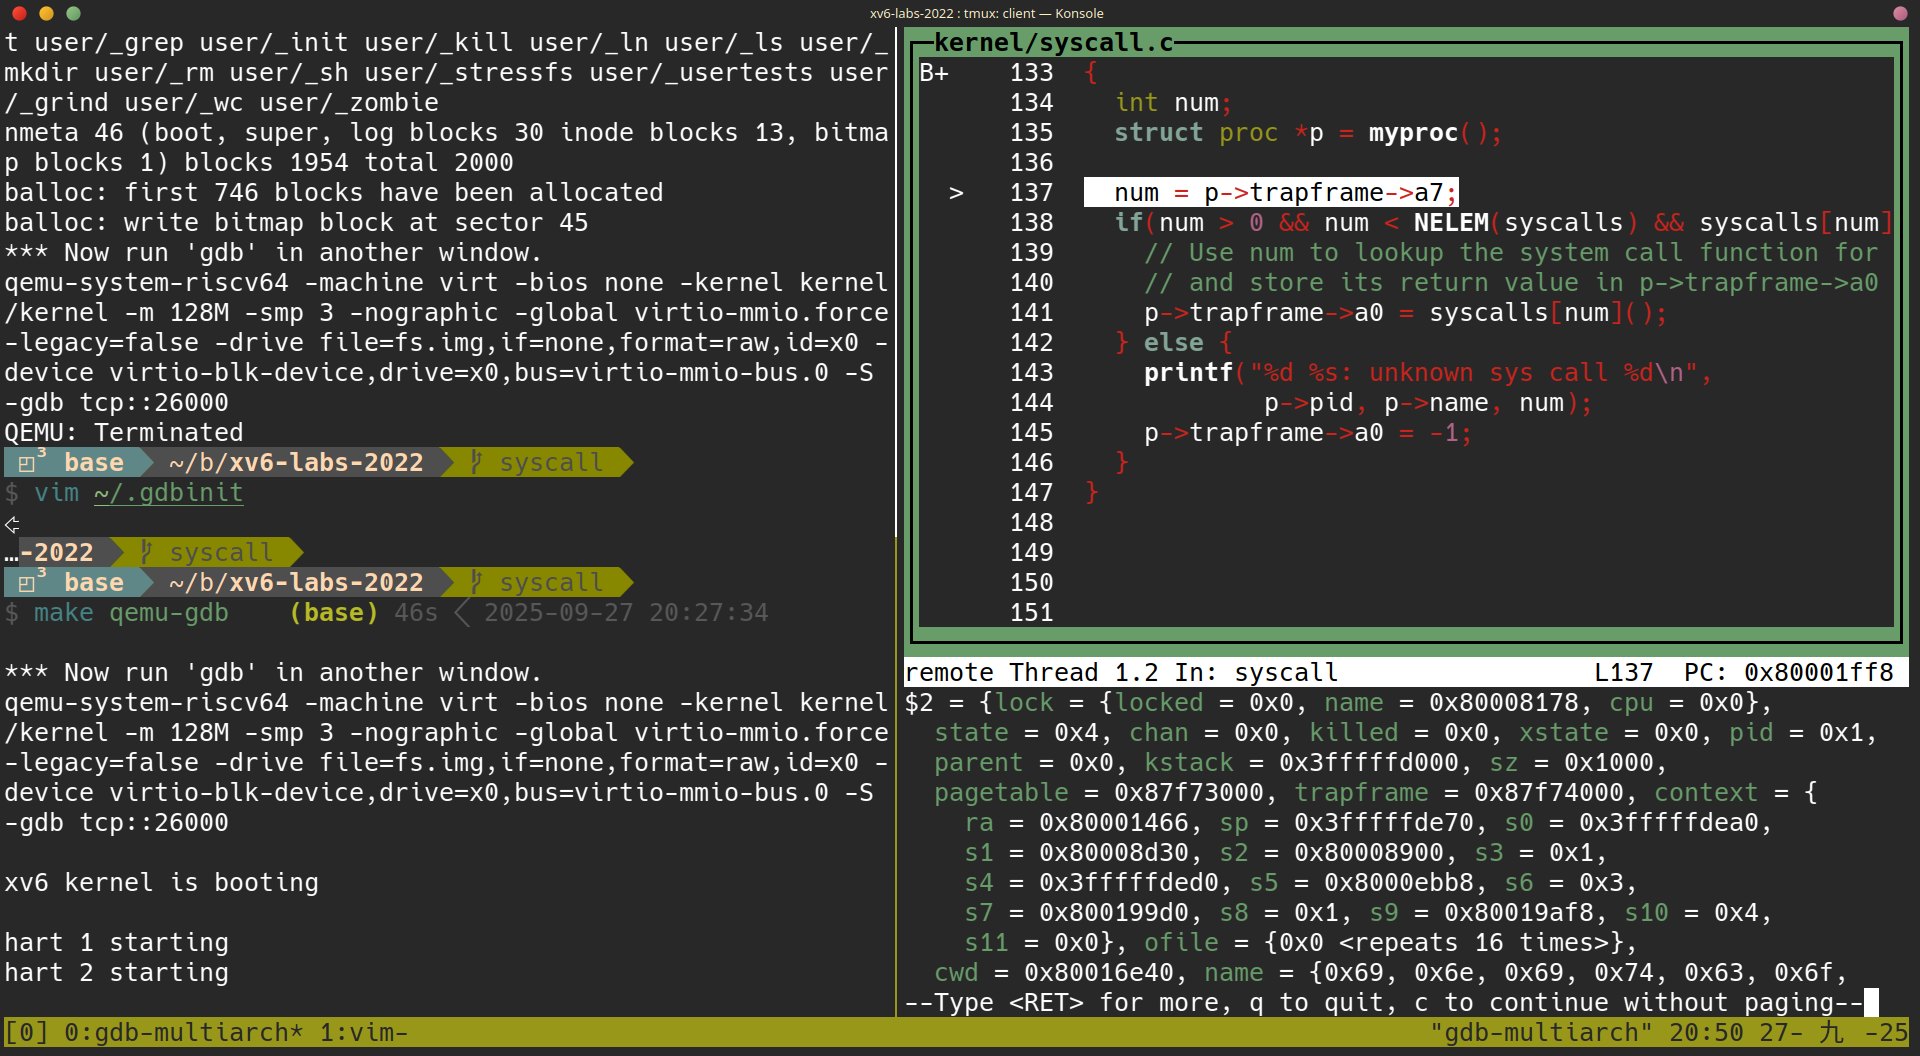
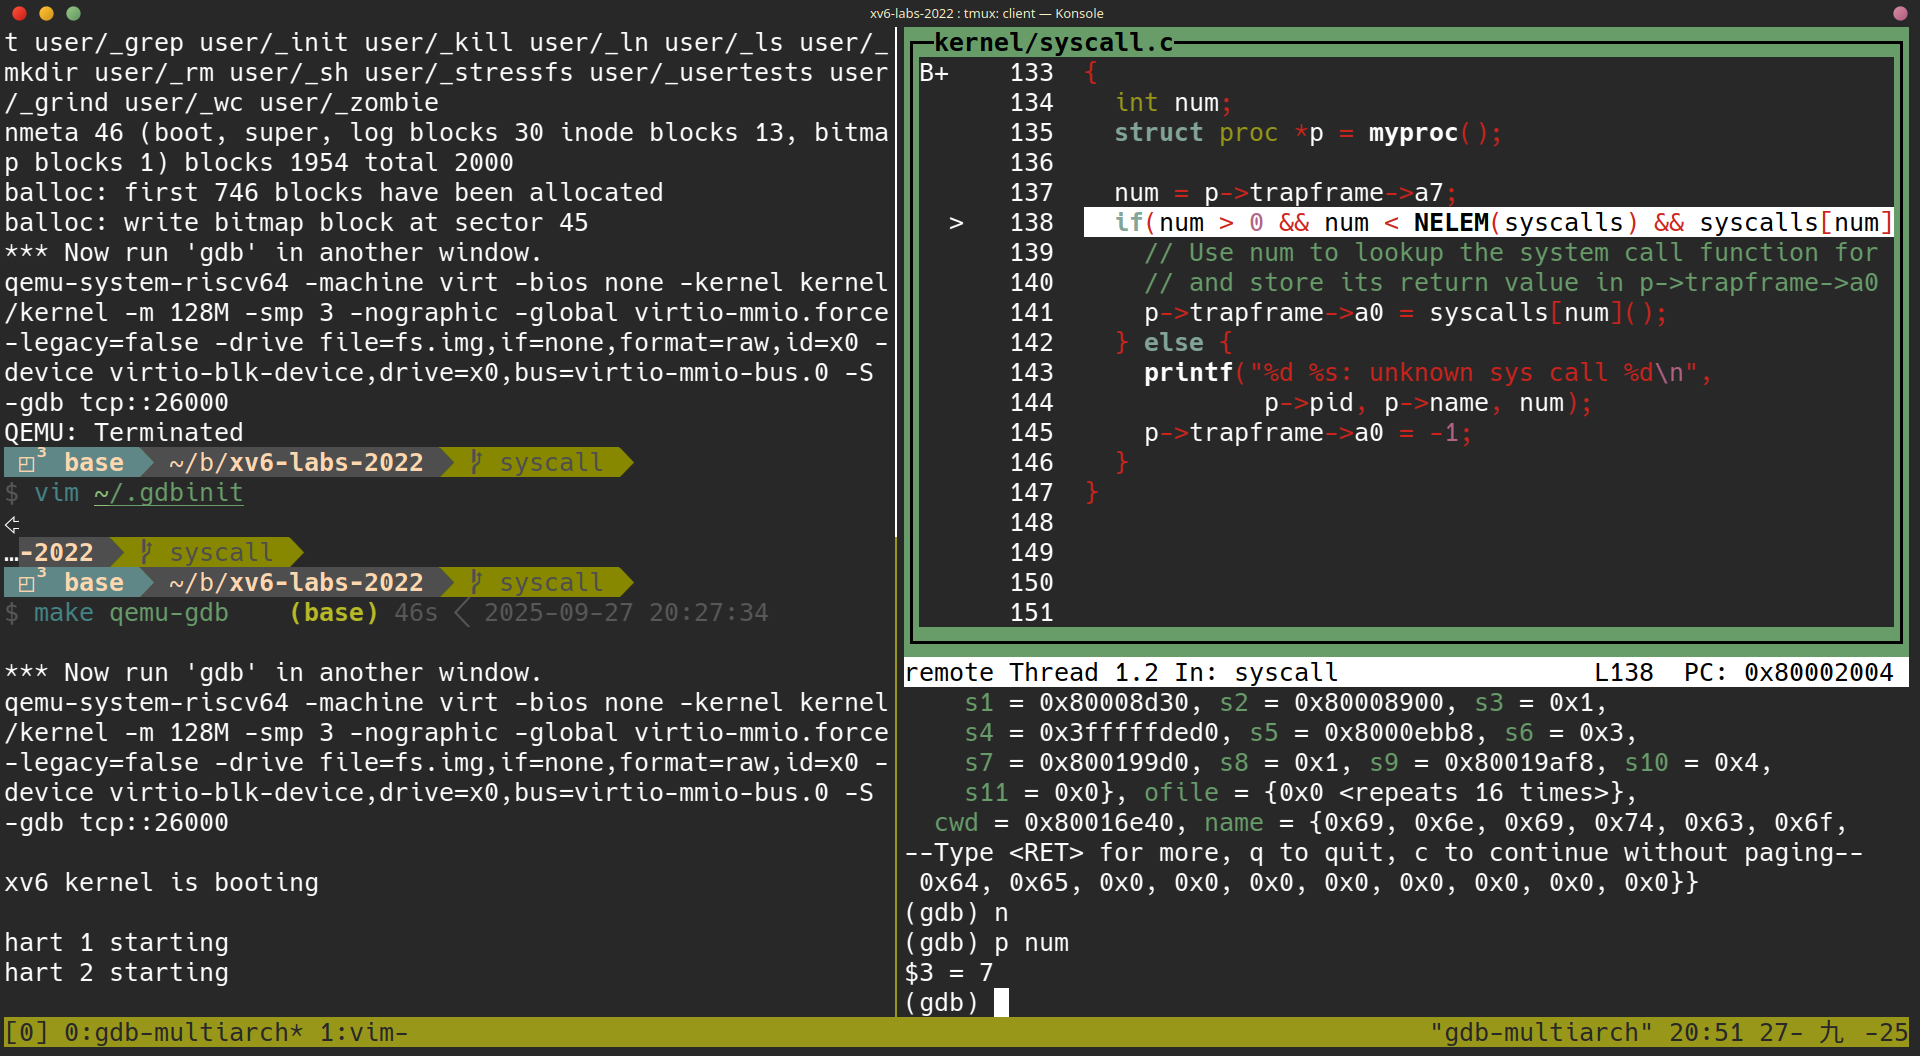
p->trapframe->a7 的意義
Type n a few times to step pass
struct proc *p = myproc();Once past this statement, typep /x *p, which prints the current process’sproc struct(seekernel/proc.h) in hex. What is the value ofp->trapframe->a7and what does that value represent? (Hint: lookuser/initcode.S, the first user program xv6 starts.)
這題照著題目的指示做,可以知道 p->trapframe->a7 == 7
(以下兩張圖可以得知目前 p->trapframe->a7 == 7)
題目也提及可以用 user/initcode.S 回推他的意義
user/initcode.S:
# Initial process that execs /init.
# This code runs in user space.

#include "syscall.h"

# exec(init, argv)
.globl start
start:
        la a0, init
        la a1, argv
        li a7, SYS_exec
        ecall

# for(;;) exit();
exit:
        li a7, SYS_exit
        ecall
        jal exit

# char init[] = "/init\0";
init:
  .string "/init\0"

# char *argv[] = { init, 0 };
.p2align 2
argv:
  .long init
  .long 0
答案:從這些訊息中,我們可以得知 p->trapframe->a7 == 7 的意義是源自於 kernel/syscall.h 中所定義的 #define SYS_exec 7,也可以推論出 p->trapframe->a7 是用來放置 system call 編號的地方。
sstatus 的意義
The processor is running in kernel mode, and we can print privileged registers such as sstatus (see RISC-V privileged instructions for a description):
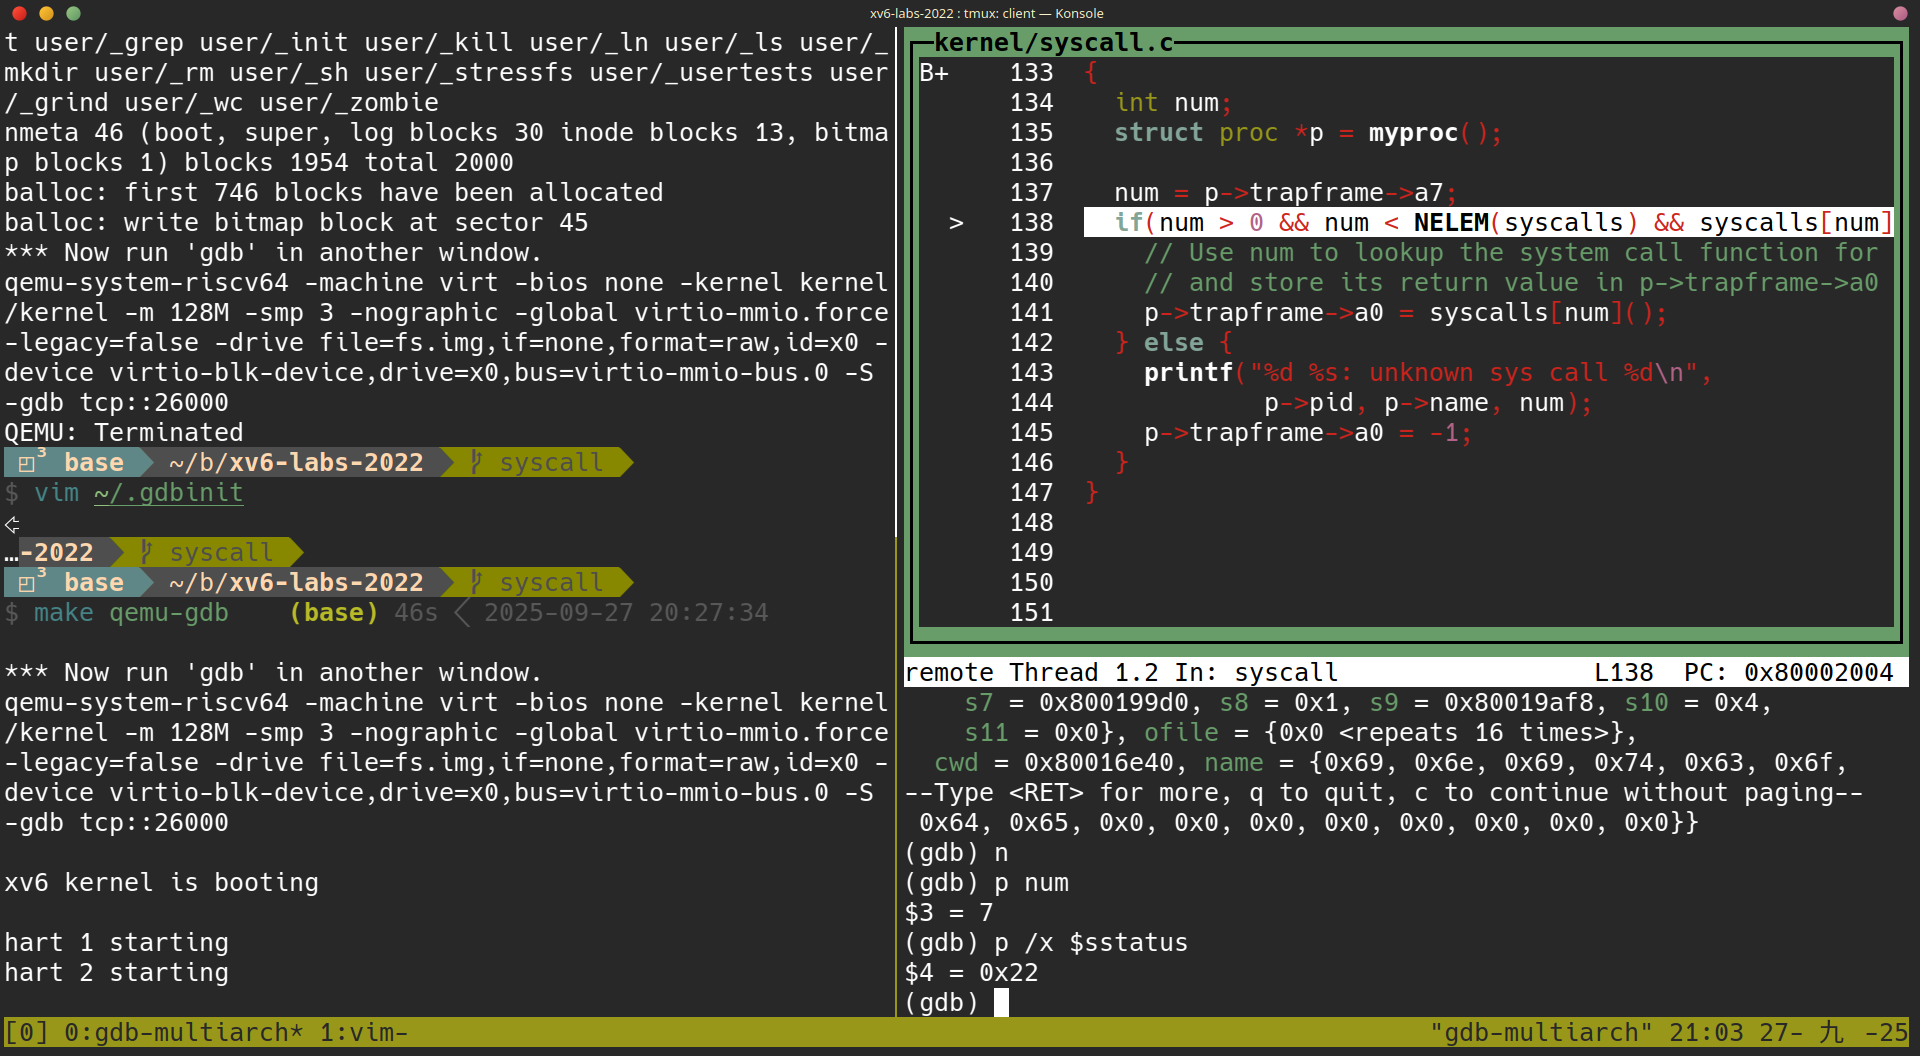 使用
使用 p /x $sstatus 可以得知現在 sstatus 的值為 0x22
查閱 RISC-V privileged instructions 的 Figure 4.2 我們可以知道 sstatus 有以下幾個 bits:
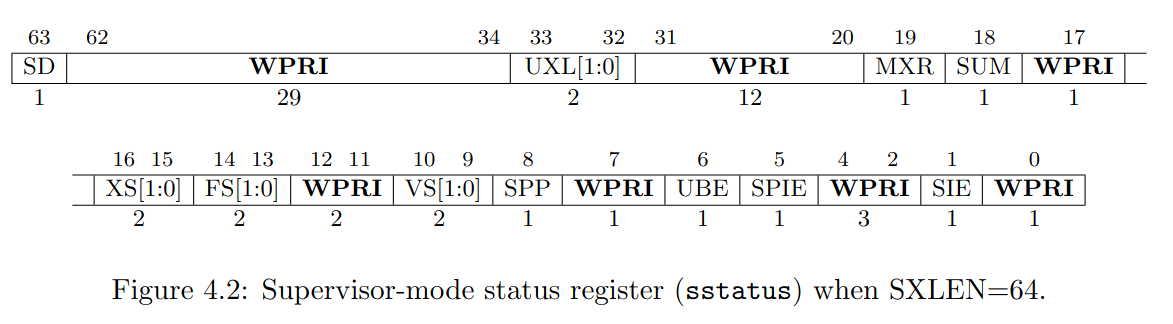
再來看看我們現在 sstatus 的值 0x22 = 0b00000000000000000000000000100010 對應到的 bits 為:
SIE == 1: Supervisor Interrupt Enable bit is set, 代表在 supervisor mode 的時候,是允許 interrupt 的。SPIE == 1: Supervisor Previous Interrupt Enable bit is set, 這裡的 “Previous” 指的是在 trap 發生之前這個 bit 的狀態,可解讀為 trap 發生之前SIE == 1SPP == 0: Supervisor Previous Privilege 為 0 代表前一個 CPU mode 為 user mode
What was the previous mode that the CPU was in?
答案: 根據 SPP == 0 得知前一個 CPU mode 為 user mode
System call tracing (moderate)
題目敘述:
In this assignment you will add a system call tracing feature that may help you when debugging later labs. You’ll create a new trace system call that will control tracing. It should take one argument, an integer
mask, whose bits specify which system calls to trace. For example, to trace the fork system call, a program callstrace(1 << SYS_fork), whereSYS_forkis a syscall number fromkernel/syscall.h. You have to modify the xv6 kernel to print out a line when each system call is about to return, if the system call’s number is set in themask. The line should contain the process id, the name of the system call and the return value; you don’t need to print the system call arguments. Thetracesystem call should enable tracing for the process that calls it and any children that it subsequently forks, but should not affect other processes.
這個題目要我們實做出一個 system call trace
在 Makefile 中的 UPROGS 區塊新增 $U/_trace:
Add
$U/_tracetoUPROGSinMakefile
這個步驟跟前幾個 lab 一樣,這裡的 user/trace.c 是這個 lab 提供的範例程式,可以讓我們得知我們實做出來的 system call trace 最終會如何被使用。
讓 trace() 可以被成功編譯
Run make qemu and you will see that the compiler cannot compile
user/trace.c…
user/trace.c:17:7: error: implicit declaration of function ‘trace’ [-Werror=implicit-function-declaration]
   17 |   if (trace(atoi(argv[1])) < 0) {
      |       ^~~~~
這是因為我們在 trace() 還沒有在 user/user.h 中宣告
這裡先來回顧從 user program (trace.c) 要經過哪些步驟才可以呼叫到一個 system call (這個 lab 要實做的 trace):
1. user/trace.c 根據 user/user.h 呼叫 trace()
user/trace.c:
#include "user/user.h"    // <-- declare trace()

int
main(int argc, char *argv[])
{
  // ...
  if (trace(atoi(argv[1])) < 0) { // <-- call to trace()
    fprintf(2, "%s: trace failed\n", argv[0]);
    exit(1);
  }
  // ...
}
user/user.h
// system calls
int fork(void);
int exit(int) __attribute__((noreturn));
int wait(int*);
int pipe(int*);
int write(int, const void*, int);
int read(int, void*, int);
int close(int);
int kill(int);
int exec(const char*, char**);
int open(const char*, int);
int mknod(const char*, short, short);
int unlink(const char*);
int fstat(int fd, struct stat*);
int link(const char*, const char*);
int mkdir(const char*);
int chdir(const char*);
int dup(int);
int getpid(void);
char* sbrk(int);
int sleep(int);
int uptime(void);
int trace(int);  // <-- add declaration
在 user program 的這個層面上,我們要把 int trace(int); 加入到 user.user.h 中
2. 利用組合語言 user/usys.S(透過 user/usys.pl 產生) 告知 trace 的位置
user/usys.S(透過user/usys.pl產生, 它會需要吃kernel/syscall.h)
#include "kernel/syscall.h" <-- add SYS_trace to "kernel/syscall.h"
.global fork
fork:
 li a7, SYS_fork
 ecall
 ret
.global exit
exit:
 li a7, SYS_exit
 ecall
 ret
...
user/usys.pl
#!/usr/bin/perl -w

# Generate usys.S, the stubs for syscalls.

print "# generated by usys.pl - do not edit\n";

print "#include \"kernel/syscall.h\"\n";

sub entry {
    my $name = shift;
    print ".global $name\n";
    print "${name}:\n";
    print " li a7, SYS_${name}\n"; # <-- should add SYS_trace to "kernel/syscall.h"
    print " ecall\n";
    print " ret\n";
}

entry("fork");
entry("exit");
entry("wait");
entry("pipe");
entry("read");
entry("write");
entry("close");
entry("kill");
entry("exec");
entry("open");
entry("mknod");
entry("unlink");
entry("fstat");
entry("link");
entry("mkdir");
entry("chdir");
entry("dup");
entry("getpid");
entry("sbrk");
entry("sleep");
entry("uptime");
entry("trace"); # <-- add this entry
kernel/syscall.h,這裡需要新增SYS_traceuser/usys.pl在做處理的時候需要用到
// System call numbers
#define SYS_fork    1
#define SYS_exit    2
#define SYS_wait    3
#define SYS_pipe    4
#define SYS_read    5
#define SYS_kill    6
#define SYS_exec    7
#define SYS_fstat   8
#define SYS_chdir   9
#define SYS_dup    10
#define SYS_getpid 11
#define SYS_sbrk   12
#define SYS_sleep  13
#define SYS_uptime 14
#define SYS_open   15
#define SYS_write  16
#define SYS_mknod  17
#define SYS_unlink 18
#define SYS_link   19
#define SYS_mkdir  20
#define SYS_close  21
#define SYS_trace  22 // <-- add this
在這個 user program 連接到 kernel system call 的層級上,我們需要做的就是修改 kernel/syscall.h 與 user/usys.pl 接著我們在透過 Makefile make qemu 時,就會產生出 user/usys.S 來告知 user program 的 trace() 最終要跑到 kernel 的 sys_trace() 執行。
現在已經可以使用 make qemu 編譯並跑起來了,但真的使用 trace 32 grep hello README 的時候卻會 fail,這是因為 sys_trace() 的定義還沒有寫出來
寫出 sys_trace() 在 kernel 中的 definition
- 在
kernel/syscall.c中加入
...
extern uint64 sys_unlink(void);
extern uint64 sys_link(void);
extern uint64 sys_mkdir(void);
extern uint64 sys_close(void);
extern uint64 sys_trace(void); // 新增這個!

// An array mapping syscall numbers from syscall.h
// to the function that handles the system call.
static uint64 (*syscalls[])(void) = {
/* ... */
[SYS_mkdir]   sys_mkdir,
[SYS_close]   sys_close,
[SYS_trace]   sys_trace, // 新增這個!
};
順帶一題,在我先前寫過的筆記 [C 語言筆記–Day14] pointer, function, array 同時出現在一行宣告時該如何解讀 有提及到這裡的 syscalls 應該解讀為
- array of
- pointers to
- functions with no arguments
- returning uint64
因解讀時的原則為:
- 由內而外的解讀
[]跟()優先於*
- 在
kernel/sysproc.c加入sys_trace()的本體
uint64
sys_trace(void)
{
    // TODO
    return 0;
}
此時使用 make qemu 把 xv6 開機,並且執行 trace 32 grep hello README; 已經不會出現 error 了,可是行為上什麼都不會發生,因為我們還沒有把 sys_trace() 實作完成
實做 sys_trace()
經過先前一大串過程,終於成功編譯 sys_trace() 了,接著來實做 sys_trace()
Add a
sys_trace()function inkernel/sysproc.cthat implements the new system call by remembering its argument in a new variable in theprocstructure (seekernel/proc.h). The functions to retrieve system call arguments from user space are inkernel/syscall.c, and you can see examples of their use inkernel/sysproc.c.
kernel/proc.h: 在這裡新增一個記下 mask 的地方
// Per-process state
struct proc {
  // ...
  uint trace_mask;             // for system call trace
};
kernel/sysproc.c: 把trace()的 argiment 放入trace_mask中
uint64
sys_trace(void)
{
  int trace_mask;

  argint(0, &trace_mask);
  myproc()->trace_mask = trace_mask;
  return 0;
}
Modify
fork()(seekernel/proc.c) to copy the trace mask from the parent to the child process.
kernel/proc.c: child 要繼承 parent 的trace_mask
int
fork(void)
{
  //...
  np->sz = p->sz;

  // copy saved user registers.
  *(np->trapframe) = *(p->trapframe);

  // Cause fork to return 0 in the child.
  np->trapframe->a0 = 0;

  // copy trace_mask to new process
  np->trace_mask = p->trace_mask;

  // ...
}
Modify the
syscall()function inkernel/syscall.cto print the trace output. You will need to add an array ofsyscallnames to index into.
krenel/syscall.c: 如果有p->trace_mask的標記並且與當前的 systecm call number 符合 (p->trace_mask & (1 << num)) 則printf出題目所需要的資訊
static char *syscall_names[] = {
[SYS_fork]    "fork",
[SYS_exit]    "exit",
[SYS_wait]    "wait",
[SYS_pipe]    "pipe",
[SYS_read]    "read",
[SYS_kill]    "kill",
[SYS_exec]    "exec",
[SYS_fstat]   "fstat",
[SYS_chdir]   "chdir",
[SYS_dup]     "dup",
[SYS_getpid]  "getpid",
[SYS_sbrk]    "sbrk",
[SYS_sleep]   "sleep",
[SYS_uptime]  "uptime",
[SYS_open]    "open",
[SYS_write]   "write",
[SYS_mknod]   "mknod",
[SYS_unlink]  "unlink",
[SYS_link]    "link",
[SYS_mkdir]   "mkdir",
[SYS_close]   "close",
[SYS_trace]   "trace",
};

void
syscall(void)
{
  int num;
  struct proc *p = myproc();

  num = p->trapframe->a7;
  if(num > 0 && num < NELEM(syscalls) && syscalls[num]) {
    // Use num to lookup the system call function for num, call it,
    // and store its return value in p->trapframe->a0
    p->trapframe->a0 = syscalls[num]();
    if (p->trace_mask & (1 << num)) {
      printf("%d: syscall %s -> %d\n",
          p->pid, syscall_names[num], p->trapframe->a0);
    }
  } else {
    printf("%d %s: unknown sys call %d\n",
            p->pid, p->name, num);
    p->trapframe->a0 = -1;
  }
}
Sysinfo (moderate)
題目敘述:
In this assignment you will add a system call,
sysinfo, that collects information about the running system. The system call takes one argument: a pointer to a structsysinfo(seekernel/sysinfo.h). The kernel should fill out the fields of this struct: thefreememfield should be set to the number of bytes of free memory, and thenprocfield should be set to the number of processes whose state is notUNUSED. We provide a test programsysinfotest; you pass this assignment if it prints “sysinfotest: OK”.
新增 system call sysinfo
這裡跟前一題一樣,先新增一個 system call sysinfo()
user/user.h: addsysinfo(struct *sysinfo)user/usys.pl: addentry("sysinfo");kernel/syscall.h: add#define SYS_sysinfo 23kernel/syscall.c: addSYS_sysinfotosyscallsandsyscall_nameskernel/sysproc.c: add the definition ofsys_sysinfo()
然後針對測試程式 sysinfotest 記得要修改 Makefile 中的 UPROGS
開始實做 sys_sysinfo()
首先我們可以先觀察題目所需要的 sysinfo:
struct sysinfo {
  uint64 freemem;   // amount of free memory (bytes)
  uint64 nproc;     // number of process
};
包含了
freemem: 剩餘的 memorynproc: 目前的 process 數量
接下來可以用三個面向來完成:
sys_sysinfo()本身freemem(): 取得剩餘的 memorynproc(): 取得目前的 process 數量
1. sys_sysinfo() 本身
sys_sysinfo() 的實做較為單純,就只是把 kernel 中的 kinfo 複製到 user 中的 uinfo,這個動作可利用 kernel/vm.c 當中的 copyout() 達成
uint64
sys_sysinfo(void)
{
  struct sysinfo *kinfo;
  struct proc *p = myproc();
  uint64 uinfo;

  argaddr(0, &uinfo);
  kinfo->freemem = freemem();
  kinfo->nproc = nproc();
  if (copyout(p->pagetable, uinfo, (char *) kinfo, sizeof(kinfo)) < 0)
    return -1;
  return 0;
}
接下來的重點就會在於 freemem() 與 nproc() 該如何實做出來
2. nproc()
proc() 需要回傳目前的
kernel/proc.h: 可以利用struct proc中的state得知是否為使用中 (不為UNUSED都算)
enum procstate { UNUSED, USED, SLEEPING, RUNNABLE, RUNNING, ZOMBIE };

// Per-process state
struct proc {
  struct spinlock lock;

  // p->lock must be held when using these:
  enum procstate state;        // Process state
  void *chan;                  // If non-zero, sleeping on chan
  int killed;                  // If non-zero, have been killed
  int xstate;                  // Exit status to be returned to parent's wait
  int pid;                     // Process ID

  // wait_lock must be held when using this:
  struct proc *parent;         // Parent process

  // these are private to the process, so p->lock need not be held.
  uint64 kstack;               // Virtual address of kernel stack
  uint64 sz;                   // Size of process memory (bytes)
  pagetable_t pagetable;       // User page table
  struct trapframe *trapframe; // data page for trampoline.S
  struct context context;      // swtch() here to run process
  struct file *ofile[NOFILE];  // Open files
  struct inode *cwd;           // Current directory
  char name[16];               // Process name (debugging)

  uint trace_mask;             // for system call trace
};
kernel/proc.c: 有一個用來紀錄 process 的列表proc
#include "types.h"
#include "param.h"
#include "memlayout.h"
#include "riscv.h"
#include "spinlock.h"
#include "proc.h"
#include "defs.h"

struct cpu cpus[NCPU];

struct proc proc[NPROC];

// helps ensure that wakeups of wait()ing
// parents are not lost. helps obey the
// memory model when using p->parent.
// must be acquired before any p->lock.
struct spinlock wait_lock;

// ...
根據以上兩個程式碼片段,我們可以檢查 proc 中不為 UNUSED 的有多少
kernel/proc.c: nproc()
uint64
nproc()
{
  int num = 0;
  struct proc *p;

  for (p = proc; p < &proc[NPROC]; p++) {
    acquire(&p->lock);
    if (p->state != UNUSED)
      num++;
    release(&p->lock);
  }
  return num;
}
3. freemem()
這裡要看 kernel/kalloc.c 畢竟 memory allocation 的時候都是要經過這裡處理,我們也可以利用類似於 kalloc() 的程式碼片段
kernel/kalloc.c:
// ...

struct {
  struct spinlock lock;
  struct run *freelist;
} kmem;

// ...

void *
kalloc(void)
{
  struct run *r;

  acquire(&kmem.lock);
  r = kmem.freelist;
  if(r)
    kmem.freelist = r->next;
  release(&kmem.lock);

  if(r)
    memset((char*)r, 5, PGSIZE); // fill with junk
  return (void*)r;
}
另外要注意的事情是 kmem.freelist 中,每一個 node 指到的是一個 page 所以最後還要考慮到一個 page 的大小,定義於 kernel/riscv.h 中的 PGSIZE
uint64
freemem(void)
{
  int npage = 0;
  struct run *r;

  acquire(&kmem.lock);
  r = kmem.freelist;
  while (r) {
    npage++;
    r = r->next;
  }
  release(&kmem.lock);
  return npage * PGSIZE;
}
最後要再 kernel/defs.h 宣告 nproc() 與 freemem()
kernel/defs.h:
// kalloc.c
// ...
uint64          freemem(void);

// proc.c
// ...
uint64          nproc(void);
最後使用 sysinfotest 做驗證,沒意外的話就完成這個 lab 了